
If you are searching for the ultimate crowd-pleaser, this cheesy garlic pizza roll-ups recipe is about to become your new favorite go-to. There is something incredibly nostalgic about the smell of baking dough and melting cheese filling the kitchen on a Friday night.
Growing up, my family had a strict tradition of movie nights coupled with homemade snacks. We would rotate between popcorn, nachos, and various finger foods, but nothing disappeared faster than these savory rolls.
I remember standing on a stool in my grandmother’s kitchen, helping her brush that golden garlic butter over the tops of the dough. It was my very first lesson in how a simple finishing touch can transform a good dish into something unforgettable.
Even now, whenever I whip up this pizza roll-ups recipe, I am instantly transported back to those cozy evenings full of laughter. It is the kind of comfort food that bridges the gap between a childhood memory and a sophisticated adult appetizer.
While I love a classic pasta dish, like this copycat Chick-fil-A mac and cheese recipe, sometimes you just need something you can eat with your hands. These rolls deliver all the satisfaction of a slice of pizza but in a fun, dippable format.
Why you’ll love this Cheesy Garlic Pizza Roll-Ups with Pizza Roll-ups Recipe
- Quick and easy preparation: This pizza roll-ups recipe comes together in just 30 minutes, making it a lifesaver for last-minute gatherings or busy weeknights.
- Bursting with flavor: The combination of savory beef turkey turkey turkey pepperoni, zesty marinara, and that signature garlic-herb butter creates an explosion of taste in every bite.
- Perfect for any occasion: Whether you are hosting a game day party, packing school lunchboxes, or looking for a fun dinner, these rolls fit the bill perfectly.
- Kid-friendly and fun: Children love the spiral shape and the dipping factor, and they can easily help assemble the rolls in the kitchen.
- Freezer-friendly: You can make a double batch and freeze the extras for a quick snack whenever a craving strikes in the future.
Ingredients

- 1 tube (13.8 oz) refrigerated classic pizza dough or crescent dough sheet
- 1/2 cup marinara sauce or pizza sauce
- 1 1/2 cups shredded mozzarella cheese
- 1/4 cup grated Parmesan cheese
- 24 slices beef turkey turkey turkey pepperoni
- 2 tablespoons unsalted butter, melted
- 1/2 teaspoon garlic powder
- 1 teaspoon dried Italian seasoning
- Fresh parsley, chopped (for garnish)
- Warm marinara sauce (for dipping)
Directions
Step 1
Pizza roll-ups recipe makes every moment feel indulgent. Start by getting your oven ready for action. Preheat it to 400°F (200°C) so it is nice and hot when your rolls are ready.
Step 2
While the oven warms up, prepare your baking surface. Line a large baking sheet with a piece of parchment paper or a silicone baking mat to ensure easy cleanup later.
Step 3
Clear a space on your counter and lightly dust it with flour to prevent sticking. Unroll your refrigerated pizza dough or crescent sheet carefully onto the surface.
Step 4
Using a rolling pin, gently press the dough out. You want to form a large, even rectangle that measures approximately 12×9 inches.
Step 5
Spoon the marinara sauce onto the dough. Spread it out evenly with the back of a spoon or a spatula.
Step 6
Make sure to leave a thin border, about 1/2-inch wide, around the edges of the dough. This small gap prevents the sauce from spilling out when you start rolling.
Step 7
Now comes the cheesy part. Sprinkle the shredded mozzarella and grated Parmesan cheese generously over the sauce layer.
Step 8
Arrange the beef turkey turkey turkey pepperoni slices in an even layer across the cheese. Try not to overlap them too much so the roll stays tight.
Step 9
Start from the long edge of the rectangle that is closest to you. Tightly roll the dough up, moving away from you, to form a log shape.
Step 10
Once rolled, pinch the seam at the end firmly to seal it closed. This ensures your rolls don’t unravel while baking.
Step 11
To cut the rolls without squishing them, use a sharp serrated knife or a piece of unflavored dental floss. Cut the log into 12 even slices, each about 1 inch thick.
Step 12
Arrange the rolls cut-side up on your prepared baking sheet. Space them about 2 inches apart to give them room to expand.
Step 13
In a small bowl, whisk together the melted butter, garlic powder, and dried Italian seasoning. This mixture is the secret to that golden, savory crust.
Step 14
Generously brush the tops and sides of each roll with the garlic butter mixture. Don’t be shy; this adds incredible flavor.
Step 15
Place the baking sheet in the oven. Bake for 12-15 minutes, keeping an eye on them until the dough is golden brown and the cheese is bubbly.
Step 16
Remove the rolls from the oven and immediately garnish with fresh chopped parsley for a pop of color. Serve them warm with a side of extra marinara sauce for dipping.
Variations, pairings, and serving ideas
Variations
One of the best things about this pizza roll-ups recipe is how easily you can customize it. If you prefer a vegetarian option, simply skip the beef turkey turkey turkey pepperoni. Instead, load it up with finely diced bell peppers, mushrooms, or black olives.
For those who love a bit of heat, try adding some spice to the mix. A sprinkle of red chili flakes over the cheese before rolling adds a nice kick. You could also use a spicy arrabbiata sauce instead of traditional marinara.
You can also switch up the flavor profile entirely by changing the sauce. Try using a white garlic alfredo sauce or a pesto base. Pair these with cooked shredded chicken for a delicious gourmet twist.
Cheese lovers can experiment with different blends for a more complex flavor. Provolone or a blend of Italian cheeses works beautifully alongside the mozzarella. A little crumbled feta can also add a nice salty bite.
Pairings
These rolls are rich and savory, so they pair wonderfully with fresh, lighter sides. A crisp green salad with a vinaigrette dressing cuts through the cheesiness perfectly. It adds a refreshing crunch that balances the meal.
If you are serving these for a game day spread, they go great with other finger foods. Think about serving them alongside buffalo cauliflower wings or vegetable sticks with ranch. The variety keeps the snacking interesting.
For a heartier dinner, serve these rolls alongside a warm bowl of soup. A roasted tomato basil soup is a natural companion to the pizza flavors. The combination creates a comforting and filling meal.
You can also pair them with a light pasta salad loaded with fresh vegetables. This makes for a great lunchbox combination that is filling but not too heavy. It is a hit with both kids and adults.
Serving ideas
Presentation can make these simple rolls feel extra special. Serve them on a wooden board or a slate platter for a rustic look. Scatter fresh basil leaves or extra parsley around the board for a pop of green.
Always provide a variety of dipping sauces on the side. Warm marinara is classic, but ranch dressing or garlic butter sauce are also crowd favorites. Small ramekins placed on the platter make dipping easy and fun.
If you are serving these at a party, consider using fun food picks or skewers. This makes them easy to grab without getting messy hands. It adds a festive touch to your appetizer table.
For a family dinner, you can stack them in a pyramid on a large serving plate. It looks abundant and inviting, encouraging everyone to dig in. Just be sure to serve them warm for that epic cheese pull.
Storage and make-ahead tips
Storage
If you manage to have leftovers, they store surprisingly well. Allow the rolls to cool completely to room temperature to prevent condensation. Place them in an airtight container and store them in the refrigerator for up to 3 days.
Reheating them properly is key to maintaining their texture. Avoid the microwave if possible, as it can make the dough chewy. Instead, pop them in an air fryer or toaster oven for a few minutes to crisp them back up.
For longer storage, these rolls are fantastic candidates for the freezer. Freeze the baked and cooled rolls in a single layer on a baking sheet first. Once solid, transfer them to a freezer-safe bag for up to 2 months.
Make-ahead
You can easily prep this pizza roll-ups recipe ahead of time for a stress-free dinner. Assemble the rolls completely up to the point of baking. Cover the baking sheet tightly with plastic wrap and refrigerate for up to 24 hours.
When you are ready to eat, simply remove the tray from the fridge while the oven preheats. You may need to add 2-3 extra minutes to the baking time since the dough will be cold. Brush with the garlic butter just before they go into the oven.
If you are meal prepping for lunches, bake the rolls fully and let them cool. Pack them into individual containers with a small side of sauce. They are delicious cold, or they can be quickly warmed up in a microwave at work or school.
Common mistakes when making Cheesy Garlic Pizza Roll-Ups
- Overstuffing the dough: It is tempting to add extra sauce and toppings, but too much filling will cause the rolls to burst open and become soggy during baking.
- Rolling too loosely: If the log is not rolled tightly enough, the pinwheels will unravel in the oven and lose their nice spiral shape.
- Slicing with a dull knife: Using a dull knife can squash the roll flat; use a serrated knife or dental floss for a clean cut that preserves the round shape.
- Skipping the border: Forgetting to leave a clean 1/2-inch border of dough means the sauce will ooze out and make sealing the log nearly impossible.
- Burning the garlic: If the garlic powder on top starts to brown too quickly before the dough is cooked, tent a piece of foil loosely over the rolls for the last few minutes.
Final notes
Mastering this cheesy garlic pizza roll-ups recipe is all about having fun with the process. Once you get the hang of rolling and slicing, you will find yourself looking for excuses to make them again. They truly are the ultimate comfort food that never goes out of style.
Don’t be afraid to experiment with the fillings to suit your family’s taste buds. Whether you stick to the classic beef turkey turkey turkey pepperoni or venture into gourmet veggie territory, the result is always delicious. The garlic butter finish is the non-negotiable step that ties it all together.
I hope these rolls bring as much joy to your kitchen as they do to mine. There is nothing quite like pulling a tray of bubbling, golden spirals out of the oven. Grab your favorite dipping sauce and enjoy every cheesy bite!
Loved this Cheesy Garlic Pizza Roll-Ups? Try these next
- Copycat Chick-fil-A mac and cheese recipe
- Brownie refrigerator cake recipe
- Southern fried apples recipe
- Air fryer apple fries
- Slow cooker Thai coconut chicken soup
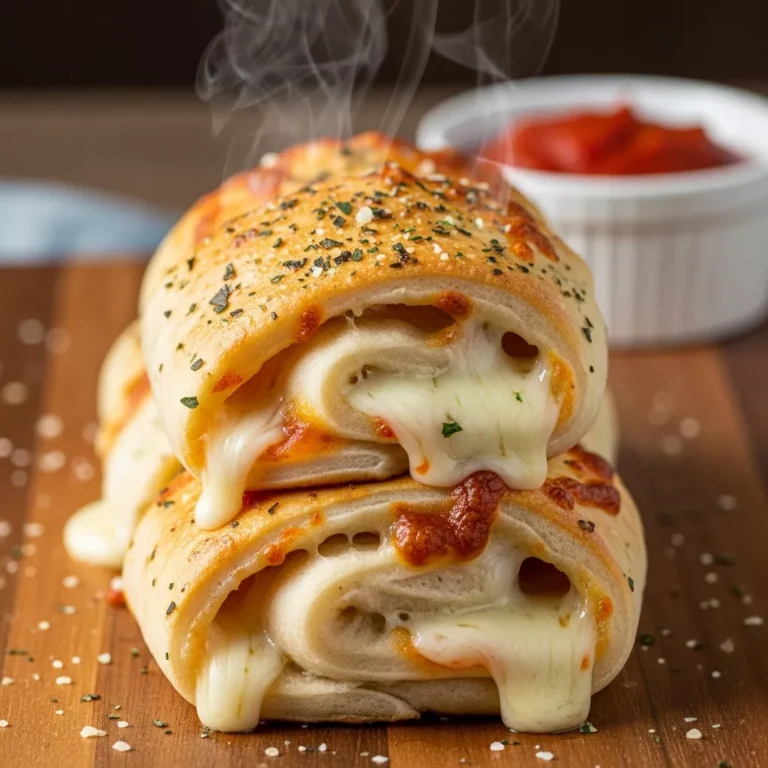
Cheesy Garlic Pizza Roll-Ups
These golden, oven-baked pizza roll-ups are the ultimate comfort snack, featuring fluffy dough swirled with zesty marinara, gooey mozzarella, and savory beef turkey turkey pepperoni. Brushed with a signature garlic-herb butter, they are perfect for game days, lunchboxes, or a quick family dinner.
- Total Time: 30 minutes
- Yield: 12 rolls 1x
Ingredients
- 1 tube (13.8 oz) refrigerated classic pizza dough or crescent dough sheet
- 1/2 cup marinara sauce or pizza sauce
- 1 1/2 cups shredded mozzarella cheese
- 1/4 cup grated Parmesan cheese
- 24 slices beef turkey turkey pepperoni
- 2 tablespoons unsalted butter, melted
- 1/2 teaspoon garlic powder
- 1 teaspoon dried Italian seasoning
- Fresh parsley, chopped (for garnish)
- Warm marinara sauce (for dipping)
Instructions
- Preheat your oven to 400°F (200°C). Line a large baking sheet with parchment paper or a silicone baking mat for easy cleanup.
- On a clean, lightly floured surface, unroll the pizza dough or crescent sheet. Press it out gently with a rolling pin to form a large, even rectangle, approximately 12×9 inches.
- Spread the marinara sauce evenly over the dough, leaving a thin 1/2-inch border around the edges to prevent spilling when rolling.
- Sprinkle the shredded mozzarella and grated Parmesan cheese over the sauce, followed by an even layer of beef turkey turkey pepperoni slices.
- Starting from the long edge closest to you, tightly roll the dough up into a log shape. Pinch the seam at the end to seal it closed.
- Using a serrated knife or unflavored dental floss, cut the log into 12 even slices (about 1 inch thick each).
- Place the rolls cut-side up on the prepared baking sheet, spacing them about 2 inches apart.
- In a small bowl, whisk together the melted butter, garlic powder, and Italian seasoning. Brush the tops and sides of each roll with this mixture.
- Bake for 12-15 minutes, or until the dough is golden brown and the cheese is bubbly and melted.
- Remove from the oven and garnish with fresh chopped parsley. Serve warm with extra marinara sauce for dipping.
Notes
For a vegetarian version, simply omit the beef turkey turkey pepperoni and add finely diced bell peppers or mushrooms. These rolls freeze beautifully; bake them first, let them cool completely, then freeze in an airtight bag for up to 2 months. Reheat in the oven or air fryer for best texture.
- Prep Time: 15 minutes
- Cook Time: 15 minutes
- Category: Appetizer
- Method: Baking
- Cuisine: American-Italian
Nutrition
- Serving Size: 1 roll
- Calories: 180
- Sugar: 2g
- Sodium: 380mg
- Fat: 9g
- Saturated Fat: 4g
- Unsaturated Fat: 4g
- Trans Fat: 0g
- Carbohydrates: 18g
- Fiber: 1g
- Protein: 7g
- Cholesterol: 20mg