Imagine a dessert that combines the rich, invigorating kick of espresso with the luxurious, melt-in-your-mouth texture of a classic cheesecake, all without ever needing to turn on your oven. That’s precisely what you get with our Velvety No-Bake Espresso Dream Cheesecake. This truly is the ultimate easy no-bake coffee cheesecake recipe, delivering sophisticated flavor with surprising simplicity. Perfect for any occasion, from a casual weeknight treat to an elegant dinner party showstopper, this cheesecake promises to be a new favorite for every coffee lover.
Why You’ll Love This Velvety No-Bake Espresso Dream Cheesecake
This isn’t just any dessert; it’s a culinary experience designed for maximum enjoyment with minimal effort. Here’s why this espresso dream will quickly become your go-to:
- Effortless Elegance: Forget the stress of water baths and cracked cheesecakes. This no-bake wonder achieves perfect creaminess with just a chill, making it surprisingly simple to create a show-stopping dessert.
- Bold Espresso Flavor: For those who savor the robust, aromatic notes of coffee, this cheesecake delivers. Each spoonful is infused with a deep, authentic espresso taste that perfectly complements the sweet, tangy cream cheese.
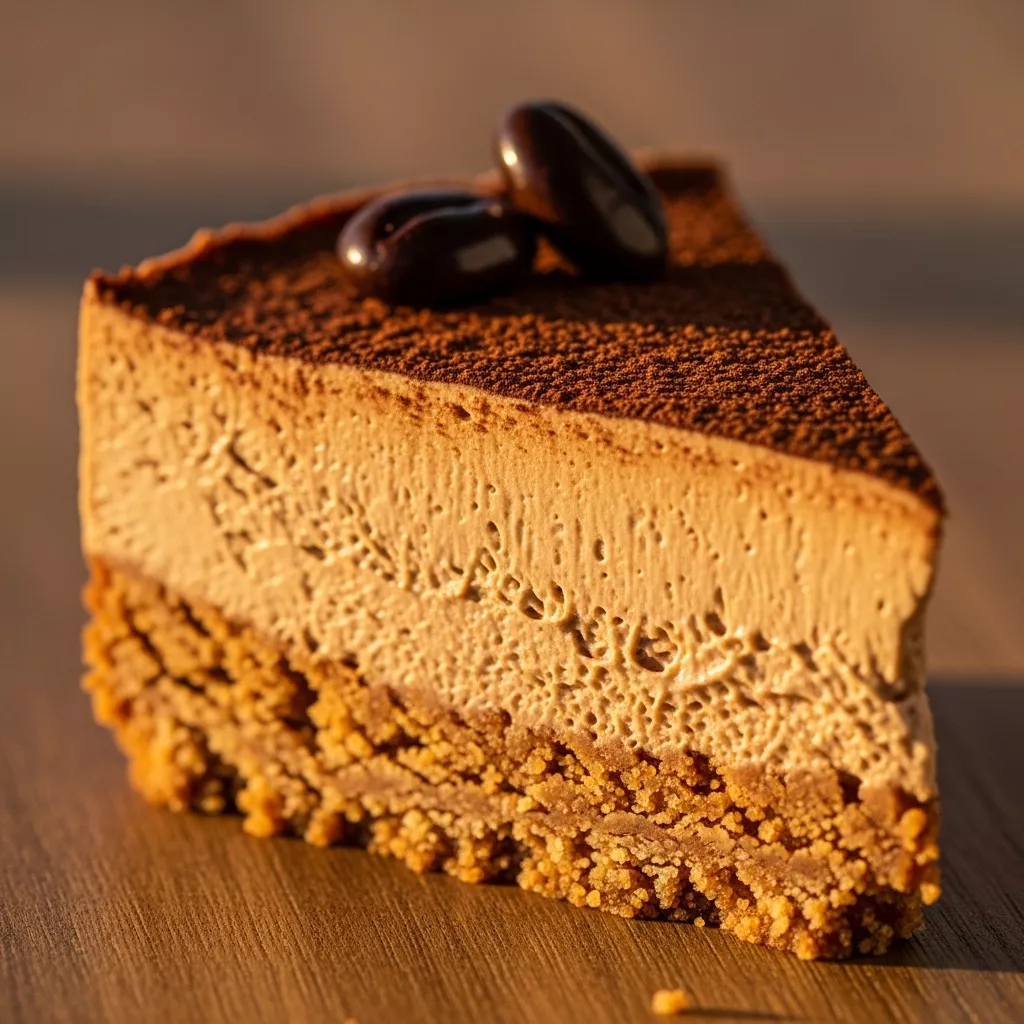
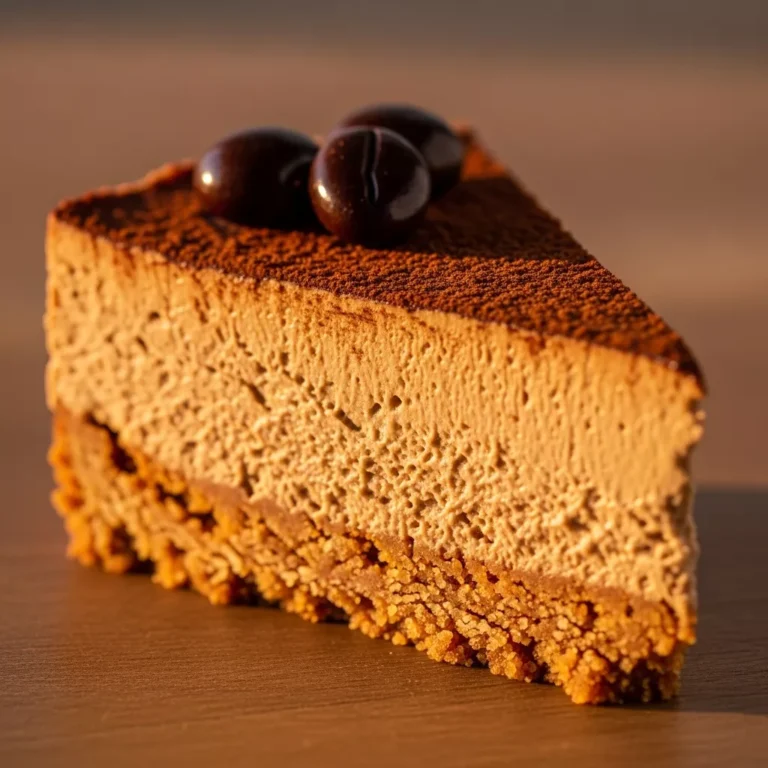
- Harmonious Textures: From the crunchy, buttery biscuit crust to the incredibly smooth, velvety filling, and finally, a delicate dusting of cocoa, this dessert offers a delightful interplay of textures in every bite.
- Perfect for Any Occasion: Whether you’re hosting a dinner party, celebrating a special event, or simply craving a luxurious treat, this cheesecake rises to the occasion. Its make-ahead nature is a host’s dream!
Ingredients & Substitutions
Crafting this Velvety No-Bake Espresso Dream Cheesecake requires a few key ingredients, each playing a crucial role in its irresistible flavor and texture. Precision matters, but some flexibility is possible:
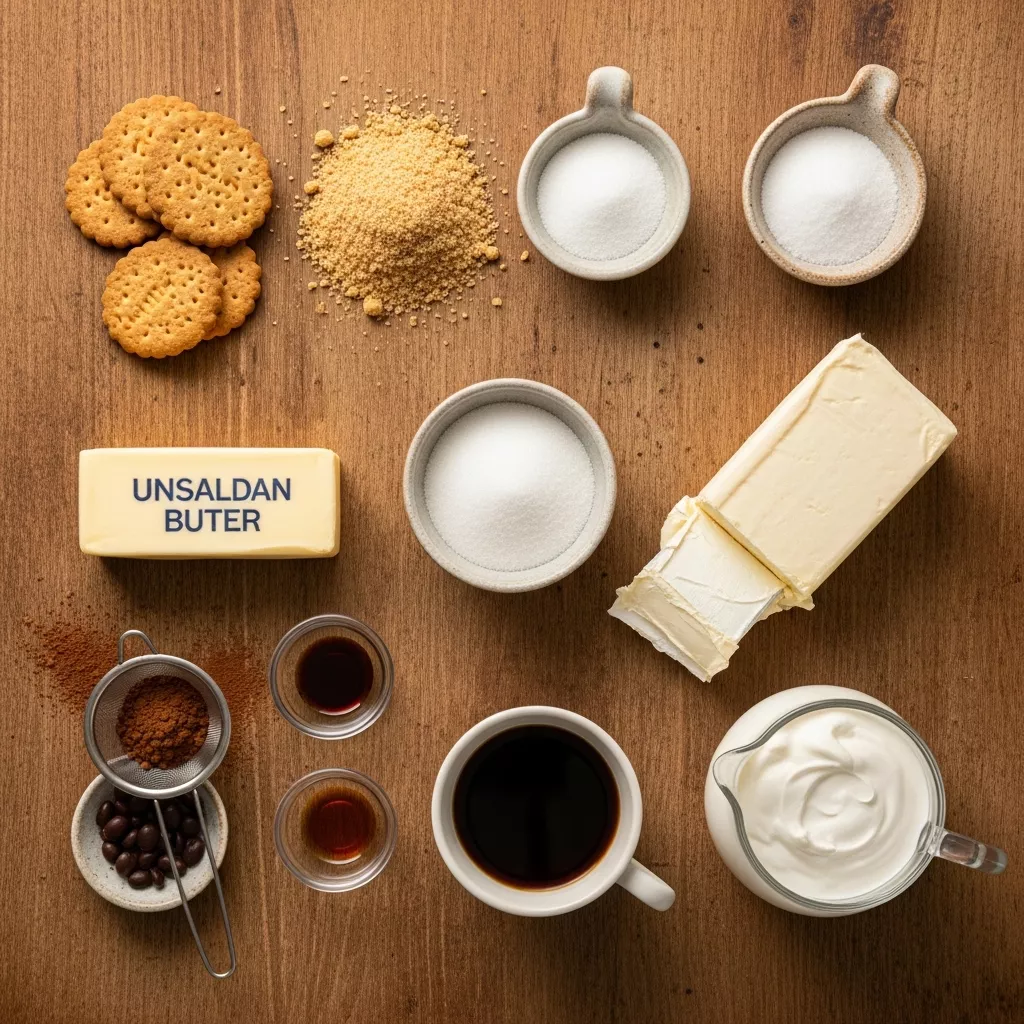
- For the Crust:
- Digestive Biscuits: These provide a classic, subtly sweet base. You can substitute with graham crackers, shortbread biscuits, or even plain vanilla wafers for a slightly different flavor profile.
- Unsalted Butter: Essential for binding the crust and adding richness.
- Granulated Sugar: A touch of sweetness to balance the biscuits.
- For the Espresso Cheesecake Filling:
- Full-Fat Cream Cheese: This is non-negotiable for the luxurious, creamy texture. Reduced-fat versions will not yield the same firm set or rich flavor. Ensure it’s softened to room temperature for a lump-free filling.
- Granulated Sugar: Sweetens the filling, balancing the espresso and cream cheese tang.
- Vanilla Extract: Enhances the overall flavor profile with its warm, aromatic notes.
- Strong Brewed Espresso: The star of the show! Freshly brewed, cooled espresso provides the best flavor. Alternatively, high-quality instant espresso powder dissolved in hot water works wonderfully. Just ensure it’s completely cooled.
- Heavy Cream (Whipping Cream): Chilled and whipped to stiff peaks, this lightens the filling, giving it that signature airy, velvety texture.
- For Garnish:
- Cocoa Powder: A final dusting adds a beautiful visual contrast and a hint of bittersweet chocolate flavor.
- Chocolate-Covered Coffee Beans (Optional): A delightful garnish that reinforces the coffee theme and adds a textural crunch.
How to Make Your Easy No-Bake Coffee Cheesecake Recipe
Follow these straightforward steps to create your own Velvety No-Bake Espresso Dream Cheesecake:
- Prepare the Crust: In a medium bowl, combine the finely crushed digestive biscuits, melted unsalted butter, and 1 tablespoon of granulated sugar. Mix thoroughly until all the crumbs are evenly coated and resemble wet sand.
- Form the Crust: Press the biscuit mixture firmly and evenly into the bottom of a 9-inch springform pan. Use the back of a spoon or the bottom of a flat-bottomed glass to compact it tightly. This firm base is crucial for a stable crust. Place the pan in the refrigerator to chill while you proceed with the filling.
- Prepare the Espresso: Brew a strong shot of espresso (or dissolve 2 teaspoons of instant espresso powder in 60ml of hot water) and set it aside to cool completely. This step is vital – hot espresso can curdle your cream cheese mixture.
- Make the Cheesecake Filling Base: In a large mixing bowl, using an electric mixer on medium speed, beat the softened full-fat cream cheese with 150g granulated sugar and vanilla extract. Continue beating for about 2-3 minutes until the mixture is completely smooth and creamy, with no lumps.
- Incorporate Espresso: Pour the completely cooled espresso into the cream cheese mixture. Beat again until it is fully combined, and the filling is smooth and uniformly colored.
- Whip the Cream: In a separate, chilled bowl (a cold bowl helps the cream whip faster), whip the cold heavy cream on high speed until stiff peaks form. Be vigilant and avoid overbeating, which can result in a grainy texture.
- Combine Filling: Gently fold the whipped cream into the cream cheese-espresso mixture in two additions using a spatula. Use a light hand and fold until just combined, ensuring no streaks of whipped cream remain. Overmixing can deflate the whipped cream, leading to a denser cheesecake.
- Assemble the Cheesecake: Pour the velvety cheesecake filling evenly over the chilled crust in the springform pan. Use a spatula to smooth the top.
- Chill to Set: Cover the springform pan loosely with plastic wrap. Refrigerate for a minimum of 4 hours, but preferably overnight. A full overnight chill guarantees the best texture and firmness.
- Garnish and Serve: Once the cheesecake is firmly set, carefully remove the springform pan sides. Dust the top generously with cocoa powder before slicing. For a final flourish, garnish with chocolate-covered coffee beans, if desired. Serve chilled. For another delightful no-bake treat, explore this easy high-protein Dunkaroo dip.
Tips for Success
Achieving cheesecake perfection is easier than you think with these expert tips:
- Room Temperature Cream Cheese: This is perhaps the most critical tip. Softened cream cheese blends smoothly, preventing lumps in your filling. Plan ahead by taking it out of the fridge at least 30-60 minutes before starting.
- Cooled Espresso is Key: Ensure your espresso is completely cold before adding it to the cream cheese mixture. Hot liquid can cause the cream cheese to curdle, ruining the smooth texture.
- Do Not Overmix: When beating the cream cheese mixture, stop once it’s smooth. When folding in the whipped cream, be gentle and stop as soon as it’s combined. Overmixing can incorporate too much air or deflate the whipped cream, affecting the final texture.
- Chill Time Matters: While 4 hours is the minimum, an overnight chill is strongly recommended. This allows the cheesecake to firm up properly, resulting in cleaner slices and a superior texture.
- Clean Slices: For presentation-perfect slices, run a sharp, thin-bladed knife under hot water and wipe it clean between each cut. This creates crisp edges.
- Springform Pan Essential: A springform pan makes removal effortless, preserving the cheesecake’s beautiful shape.
Serving Suggestions
While this Velvety No-Bake Espresso Dream Cheesecake is magnificent on its own, a few thoughtful additions can elevate it further:
- Classic Cocoa Dusting: A generous dusting of cocoa powder is simple, elegant, and provides a lovely visual and flavor contrast.
- Chocolate-Covered Coffee Beans: These add a gourmet touch, a satisfying crunch, and amplify the coffee theme.
- Fresh Berries: A scattering of fresh raspberries or sliced strawberries can offer a bright, tart counterpoint to the rich, creamy sweetness.
- Shaved Chocolate: Dark or milk chocolate shavings can add another layer of indulgence and visual appeal.
- Extra Whipped Cream: A dollop of plain, unsweetened whipped cream on the side can lighten the richness of each slice.
Storage & Reheating
This cheesecake is best enjoyed chilled, and its make-ahead nature is a huge plus!
- Storage: Store any leftover cheesecake covered loosely with plastic wrap or in an airtight container in the refrigerator for up to 3-4 days.
- Serving Temperature: Always serve this cheesecake chilled for the best texture and flavor.
FAQ
Q: Can I use low-fat cream cheese for this recipe?
A: It is highly recommended to use full-fat cream cheese. Low-fat versions may not set properly and will result in a less rich and creamy texture.
Q: What if I don’t have a springform pan?
A: While a springform pan is ideal for easy release and presentation, you can use a regular 9-inch round cake pan lined with parchment paper, leaving an overhang on two sides to lift the cheesecake out. Alternatively, individual serving ramekins or glasses work well for mini cheesecakes.
Q: Can I use decaf espresso?
A: Absolutely! If you prefer to avoid caffeine, decaf espresso will provide the same wonderful coffee flavor without the stimulating effects.
Q: My crust seems too crumbly. What went wrong?
A: Ensure your melted butter is fully incorporated into the crushed biscuits. Also, make sure you press the mixture very firmly into the pan. If it’s still too dry, you can add another teaspoon of melted butter.
Q: How can I prevent my cheesecake from being too soft?
A: The most common reason for a soft no-bake cheesecake is insufficient chilling time. Ensure it chills for at least 4 hours, or ideally overnight. Also, make sure your heavy cream was whipped to stiff peaks and gently folded in, and that your cream cheese was full-fat.
This Velvety No-Bake Espresso Dream Cheesecake is a testament to the fact that extraordinary desserts don’t always require extraordinary effort. With its deep coffee flavor, luscious texture, and effortless preparation, it’s a recipe that promises to impress and delight every time. So go ahead, whip up this no-bake masterpiece, chill, and prepare to indulge in pure espresso-infused bliss. For another energizing treat, try our energizing healthy buckeyes recipe!
Velvety No-Bake Espresso Dream Cheesecake
Imagine a decadent, creamy cheesecake that requires no oven time, just a simple chill to achieve perfection. This espresso-infused masterpiece features a rich, buttery crushed biscuit crust, a luscious filling bursting with the bold flavor of freshly brewed espresso and smooth cream cheese, all crowned with a delicate dusting of cocoa. It’s the ultimate treat for coffee lovers, effortlessly elegant, and surprisingly simple to prepare, making it ideal for entertaining or a luxurious weeknight indulgence. Every spoonful delivers a harmonious blend of sweet, creamy, and robust coffee notes that will leave you craving more.
- Total Time: 25 minutes
- Yield: 8 servings 1x
Ingredients
- For the Crust:
- 200g digestive biscuits (or similar plain sweet biscuits), finely crushed
- 90g unsalted butter, melted
- 1 tablespoon granulated sugar
- For the Espresso Cheesecake Filling:
- 450g full-fat cream cheese, softened
- 150g granulated sugar
- 1 teaspoon vanilla extract
- 60ml strong brewed espresso (cooled) or 2 teaspoons instant espresso powder dissolved in 60ml hot water, cooled
- 300ml heavy cream (whipping cream), chilled
- For Garnish:
- Cocoa powder, for dusting
- Chocolate-covered coffee beans (optional)
Instructions
- Prepare the Crust: In a medium bowl, combine the finely crushed digestive biscuits, melted butter, and 1 tablespoon of granulated sugar. Mix well until the crumbs are thoroughly coated.
- Form the Crust: Press the biscuit mixture firmly and evenly into the bottom of a 9-inch springform pan. Use the back of a spoon or the bottom of a glass to compact it. Place the pan in the refrigerator to chill while you prepare the filling.
- Prepare the Espresso: Brew a strong shot of espresso (or dissolve instant espresso powder in hot water) and set it aside to cool completely.
- Make the Cheesecake Filling Base: In a large mixing bowl, beat the softened cream cheese with 150g granulated sugar and vanilla extract using an electric mixer on medium speed until smooth and creamy, about 2-3 minutes.
- Incorporate Espresso: Pour the cooled espresso into the cream cheese mixture and beat until fully combined and smooth.
- Whip the Cream: In a separate, chilled bowl, whip the cold heavy cream on high speed until stiff peaks form. Be careful not to overbeat.
- Combine Filling: Gently fold the whipped cream into the cream cheese-espresso mixture in two additions using a spatula, until just combined and no streaks remain. Do not overmix, as this can deflate the cream.
- Assemble the Cheesecake: Pour the cheesecake filling over the chilled crust in the springform pan. Smooth the top with a spatula.
- Chill to Set: Cover the springform pan loosely with plastic wrap and refrigerate for a minimum of 4 hours, or preferably overnight, until the cheesecake is firmly set.
- Garnish and Serve: Once set, carefully remove the springform pan sides. Dust the top generously with cocoa powder before slicing. Garnish with chocolate-covered coffee beans, if desired. Serve chilled.
Notes
For best results, ensure your cream cheese is at room temperature to prevent lumps. The espresso must be completely cooled before adding to the cream cheese mixture, otherwise, it can curdle the cream cheese. Chilling for a full overnight period guarantees the best texture and firmness. To get clean slices, run a sharp knife under hot water and wipe it clean between each cut. Store leftover cheesecake covered in the refrigerator for up to 3-4 days.
- Prep Time: 25 minutes
- Cook Time: 0 minutes
- Category: Dessert
- Method: No-Bake, Chilling
- Cuisine: Modern American
Nutrition
- Serving Size: 1 serving
- Calories: 420
- Sugar: 32g
- Sodium: 210mg
- Fat: 28g
- Saturated Fat: 18g
- Unsaturated Fat: 9g
- Trans Fat: 0g
- Carbohydrates: 45g
- Fiber: 1g
- Protein: 6g
- Cholesterol: 95mg