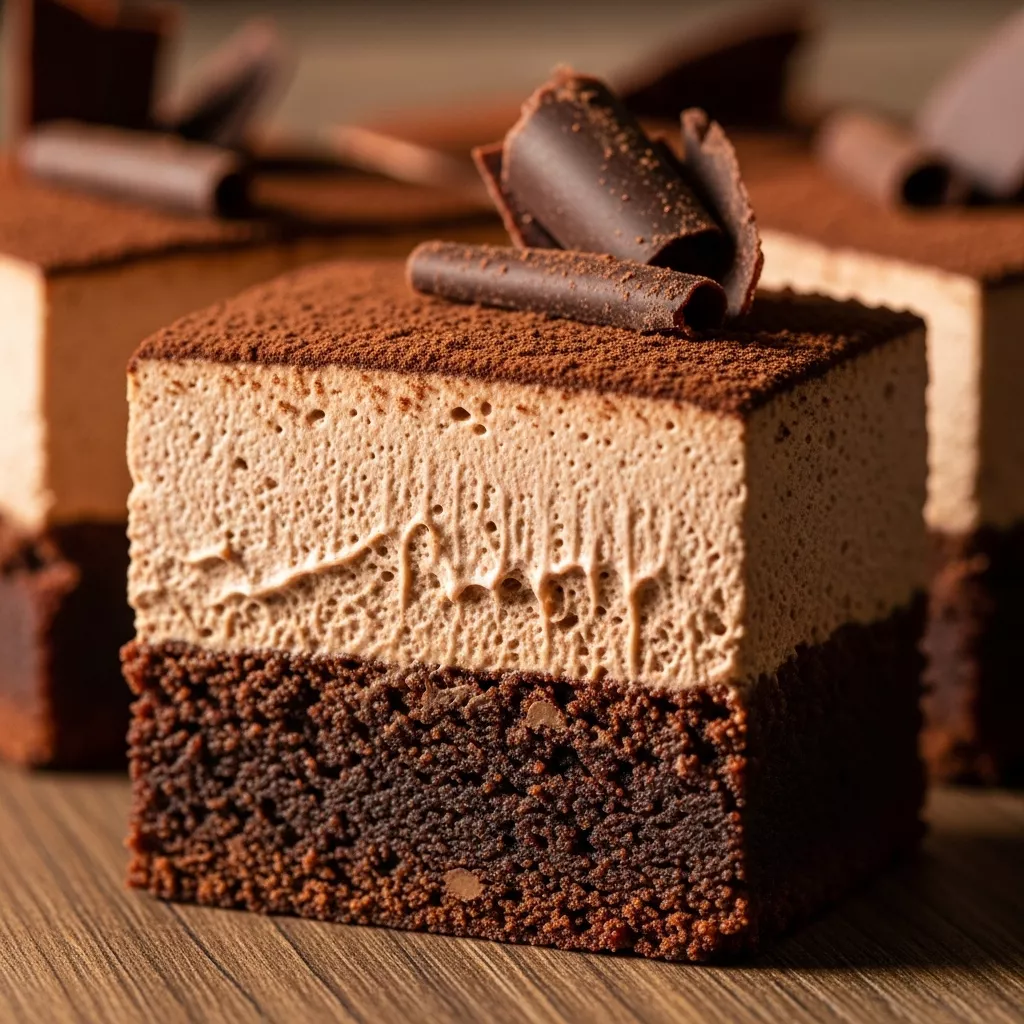
Prepare to elevate your dessert repertoire with a creation that’s less a treat and more an experience: the Velvet Cloud Chocolate Mousse Brownies. Imagine sinking your teeth into a brownie so deeply fudgy, so intensely chocolatey, it could win awards, then immediately being enveloped by a cloud of light, airy, yet incredibly creamy chocolate mousse. This isn’t just about satisfying a sweet tooth; it’s about embarking on a journey through layers of pure cocoa bliss, offering an unparalleled textural symphony that will leave a lasting impression. These Decadent Chocolate Mousse Brownies promise a moment of pure culinary delight, perfect for any occasion that calls for something truly special.
Why You’ll Love These Decadent Chocolate Mousse Brownies
These brownies aren’t just a dessert; they’re a celebration of chocolate in its most glorious forms. Here’s why they’re destined to become a favorite:
- A Symphony of Textures: The magic lies in the contrast. A dense, chewy, intensely fudgy brownie base meets an ethereal, silky-smooth chocolate mousse. Each bite delivers a delightful interplay that keeps you coming back for more.
- Unrivaled Chocolate Depth: From the rich cocoa powder and semi-sweet chips in the brownie to the dark chocolate in the mousse, this recipe is designed to deliver a profound, multi-layered chocolate flavor that true connoisseurs will appreciate.
- Elegance Made Attainable: While these brownies look sophisticated and gourmet, the recipe is straightforward. With clear steps and helpful tips, even a home baker can achieve a professional-looking and tasting dessert.
- Perfect for Any Occasion: Whether you’re hosting a dinner party, celebrating a special event, or simply craving an indulgent treat, these double-layer delights are guaranteed to impress.
Ingredients & Substitutions
Crafting these extraordinary brownies begins with quality ingredients. Here’s a breakdown and some considerations:
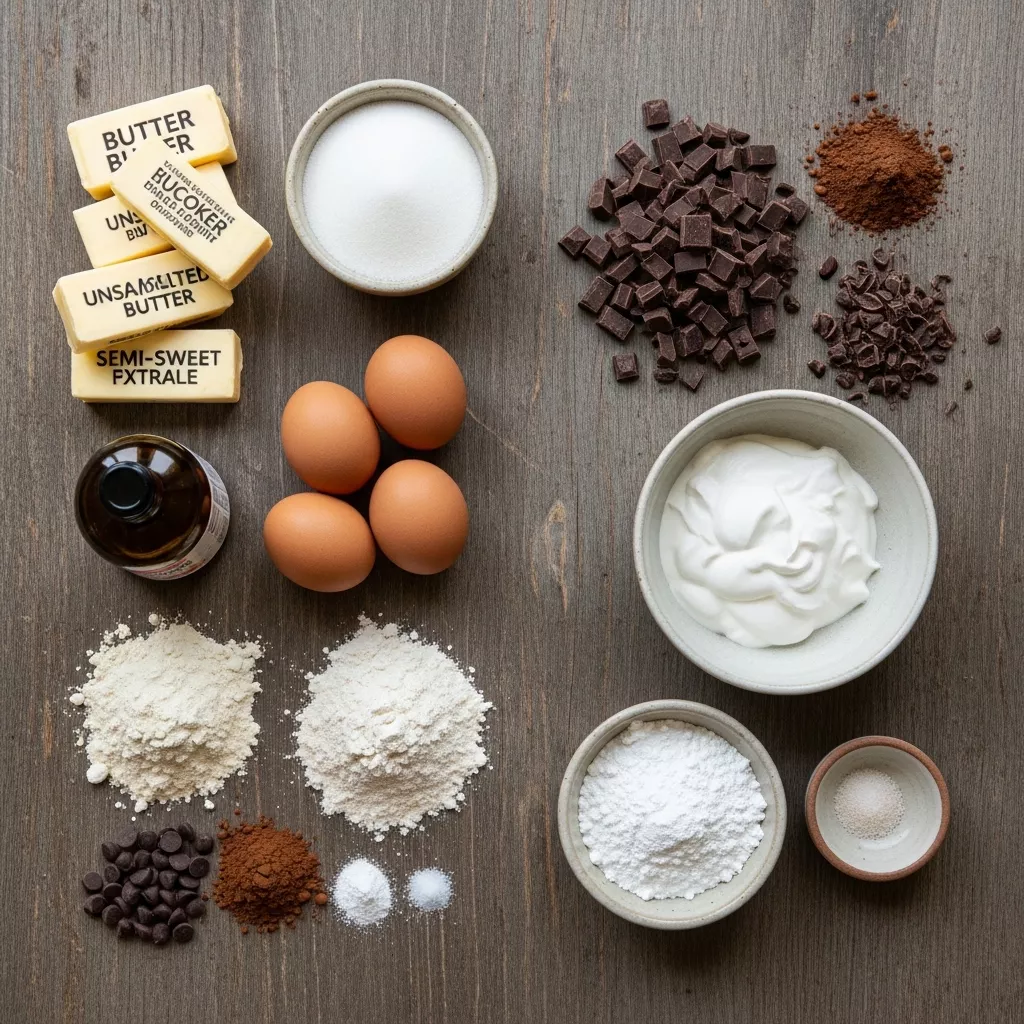
For the Fudgy Brownie Layer:
- Unsalted Butter: Melted butter contributes to the fudgy texture. Using unsalted butter allows you to control the salt content precisely.
- Granulated Sugar: Provides sweetness and helps achieve that desirable chewy crust.
- Large Eggs: Binds the ingredients and adds richness.
- Vanilla Extract: Essential for enhancing chocolate flavor.
- All-Purpose Flour: The structure of the brownie. For a gluten-free option, a 1:1 gluten-free baking blend can often be substituted, though results may vary slightly.
- Unsweetened Cocoa Powder: The primary chocolate flavor for the brownie. Use a good quality unsweetened cocoa for the best depth of flavor.
- Baking Powder: A touch helps with the brownie’s lift without making it cakey.
- Salt: Balances sweetness and amplifies chocolate notes.
- Semi-Sweet Chocolate Chips: Adds pockets of melted chocolate throughout the brownie. You can substitute with dark chocolate chips for more intensity, or milk chocolate for a sweeter profile.
For the Silky Chocolate Mousse Layer:
- Dark Chocolate (60-70% cacao): This is the heart of your mousse. Finely chopped quality dark chocolate is key for a smooth melt and rich flavor. Avoid chocolate chips here, as they often contain stabilizers that can affect the mousse’s texture.
- Heavy Cream, very cold: Essential for whipping into soft peaks and creating the mousse’s light, airy texture. Ensure it’s very cold for optimal whipping.
- Powdered Sugar: Sweetens the mousse without adding graininess.
- Vanilla Extract: Complements the chocolate.
- Pinch of Salt: Again, for balance and flavor enhancement.
For Garnish (Optional):
- Cocoa powder for dusting: Adds an elegant finish and another layer of chocolate aroma.
- Chocolate shavings: For a sophisticated visual appeal and extra chocolatey bite.
How to Make Velvet Cloud Chocolate Mousse Brownies
Follow these steps to create your own double-layered masterpiece:
1. Prepare the Brownie Layer:
- Preheat your oven to 350°F (175°C). Line a 9×13-inch baking pan with parchment paper, ensuring an overhang on the sides for easy removal. Lightly grease the parchment.
- In a large bowl, combine the melted butter and granulated sugar, whisking until smooth. Beat in the eggs one at a time, then stir in the vanilla extract.
- In a separate medium bowl, whisk together the flour, cocoa powder, baking powder, and salt. Gradually add these dry ingredients to the wet mixture, mixing until just combined. Be careful not to overmix. Fold in the chocolate chips.
- Pour the batter into the prepared pan and spread evenly. Bake for 25-30 minutes, or until a toothpick inserted into the center comes out with moist crumbs. Do not overbake; fudgy brownies are slightly underbaked.
- Remove the brownies from the oven and let them cool completely in the pan on a wire rack. This step is critical and takes at least 1-2 hours.
2. Prepare the Silky Chocolate Mousse Layer:
- While the brownies cool, melt the finely chopped dark chocolate using a double boiler or in 30-second intervals in the microwave, stirring until smooth. Let it cool slightly, but ensure it remains liquid.
- In a large, chilled bowl, whip the very cold heavy cream, powdered sugar, vanilla extract, and a pinch of salt with an electric mixer on medium-high speed until soft peaks form. Watch carefully to avoid over-whipping, which can make the mousse grainy.
- Gently fold about a third of the whipped cream into the slightly cooled melted chocolate to lighten it. This tempering step helps prevent the chocolate from seizing.
- Carefully fold in the remaining whipped cream until no streaks of chocolate remain and the mousse is light and airy. Again, do not overmix.
3. Assemble and Chill:
- Once the brownies are completely cool, spread the chocolate mousse evenly over the top.
- Cover the pan loosely with plastic wrap.
- Refrigerate for at least 2 hours, or until the mousse is firmly set. For the cleanest, most perfect slices, chill for 4 hours or even overnight.
4. Garnish and Serve:
- Using the parchment paper overhang, carefully lift the brownies out of the pan.
- Dust with cocoa powder and/or chocolate shavings before slicing into squares.
- Serve chilled and enjoy your double-layered bliss!
Tips for Success
- Cool Brownies Completely: This cannot be stressed enough. If your brownie base is even slightly warm, it will melt the mousse, resulting in a messy, unset dessert. Patience is key!
- Chill Your Cream and Bowl: For the best whipped cream, ensure your heavy cream is very cold, and if possible, chill your mixing bowl and whisk attachment for 10-15 minutes before whipping.
- Don’t Overmix: Overmixing brownie batter develops gluten, leading to a tougher, cakey brownie. Overmixing whipped cream or mousse can result in a grainy texture. Mix just until combined for both layers.
- Quality Chocolate Matters: Especially for the mousse, a good quality dark chocolate (60-70% cacao) will make a noticeable difference in flavor and texture.
- Espresso Powder for Depth: For an extra depth of flavor that intensifies the chocolate without making it taste like coffee, add 1 teaspoon of espresso powder to the brownie batter with the dry ingredients.
- Proper Chilling for Mousse: If your chocolate mousse doesn’t seem to set, it’s likely due to either the melted chocolate being too warm when folded in, or insufficient chilling time. Give it ample time in the refrigerator.
Serving Suggestions
While these brownies are spectacular on their own, a few simple additions can elevate them further:
- Fresh Berries: A scattering of fresh raspberries or sliced strawberries adds a pop of color and a tart counterpoint to the rich chocolate.
- Extra Whipped Cream: A small dollop of lightly sweetened whipped cream can add another layer of lightness.
- Aromatic Dusting: Beyond cocoa powder, consider a light dusting of cinnamon or even a tiny pinch of sea salt flakes for an intriguing flavor twist.
- Beverage Pairings: Serve alongside a strong espresso, a glass of cold milk, or for a sophisticated touch, a robust red grape juice.
Storage & Reheating
These Velvet Cloud Chocolate Mousse Brownies are best enjoyed chilled.
- Storage: Store leftovers in an airtight container in the refrigerator for up to 3-4 days. The mousse needs to stay cold to maintain its texture.
- Reheating: These brownies are not suitable for reheating. They are designed to be served cold, as the mousse layer will melt at room temperature.
FAQ
Q: Can I make these brownies ahead of time?
A: Absolutely! In fact, they are even better when made a day in advance, as this allows the mousse to fully set and the flavors to meld beautifully. Just be sure to keep them refrigerated.
Q: My mousse didn’t set properly. What went wrong?
A: There are a few common culprits:
- Warm Chocolate: If your melted chocolate was too warm when you folded in the whipped cream, it can melt the cream and prevent setting. Ensure it’s cooled slightly but still liquid.
- Not Cold Enough Cream: Very cold heavy cream whips best and helps the mousse set.
- Overmixing/Undermixing Whipped Cream: Over-whipped cream can become grainy; under-whipped cream won’t provide enough structure. Aim for soft peaks.
- Insufficient Chilling: The mousse needs a minimum of 2 hours, but 4 hours or overnight yields the best, firmest results.
Q: Can I use milk chocolate for the mousse?
A: While you can, using milk chocolate will result in a much sweeter and less intense chocolate flavor for the mousse. Dark chocolate (60-70% cacao) is recommended for its depth and balance against the brownie’s sweetness. For another delightful brownie variation, consider these Cherry Chocolate Brownie Cheesecake Bars.
Q: Can I freeze these brownies?
A: You can, but the texture of the mousse may change slightly upon thawing, potentially becoming a bit grainier. Wrap individual slices tightly in plastic wrap, then foil, and store in an airtight container for up to 1 month. Thaw in the refrigerator overnight.
Q: What if I don’t have a 9×13-inch pan?
A: This recipe is optimized for a 9×13-inch pan. Using a different size will alter the thickness of your layers and potentially the baking time. If you use a smaller pan, you may need to adjust quantities or expect thicker brownies and a longer bake time. For another take on convenient brownies, check out these Samoa Box Mix Brownies.
The Velvet Cloud Chocolate Mousse Brownies are more than just a dessert; they are a culinary achievement that brings joy and elegance to any table. With their irresistible combination of rich, fudgy brownie and light, airy mousse, they truly live up to their name. Don’t hesitate to embark on this delicious journey – your taste buds (and your guests) will thank you for it!
Velvet Cloud Chocolate Mousse Brownies: A Decadent Double-Layer Dream
Imagine a brownie so fudgy, so intensely chocolatey, it practically melts in your mouth. Now, picture that rich base topped with a cloud of light, airy, yet incredibly creamy chocolate mousse, perfectly chilled. This isn’t just a dessert; it’s an experience. Our Velvet Cloud Chocolate Mousse Brownies deliver an unparalleled textural symphony, combining the dense chew of a classic brownie with the ethereal smoothness of a gourmet mousse. Each bite is a journey through layers of pure chocolate bliss, a truly decadent treat perfect for impressing guests or simply indulging your deepest cocoa cravings. Prepare for a dessert that’s both elegant and utterly irresistible, promising a moment of pure culinary delight.
- Total Time: 1 hour 15 minutes
- Yield: 12 generous servings 1x
Ingredients
- For the Fudgy Brownie Layer:
- 1 cup (2 sticks) unsalted butter, melted
- 2 cups granulated sugar
- 4 large eggs
- 2 teaspoons vanilla extract
- 1 cup all-purpose flour
- ¾ cup unsweetened cocoa powder
- ½ teaspoon baking powder
- ½ teaspoon salt
- 1 cup semi-sweet chocolate chips
- For the Silky Chocolate Mousse Layer:
- 12 ounces dark chocolate (60-70% cacao), finely chopped
- 2 cups heavy cream, very cold
- ½ cup powdered sugar
- 1 teaspoon vanilla extract
- Pinch of salt
- For Garnish (Optional):
- Cocoa powder for dusting
- Chocolate shavings
Instructions
- Preheat your oven to 350°F (175°C). Line a 9×13-inch baking pan with parchment paper, leaving an overhang on the sides for easy removal, then lightly grease.
- In a large bowl, whisk together the melted butter and granulated sugar until well combined. Beat in the eggs one at a time, then stir in the vanilla extract until smooth.
- In a separate medium bowl, whisk together the flour, cocoa powder, baking powder, and salt. Gradually add the dry ingredients to the wet ingredients, mixing until just combined. Do not overmix. Fold in the chocolate chips.
- Pour the brownie batter into the prepared pan and spread evenly. Bake for 25-30 minutes, or until a toothpick inserted into the center comes out with moist crumbs, not wet batter. Do not overbake.
- Remove the brownies from the oven and let them cool completely in the pan on a wire rack. This is crucial before adding the mousse layer (at least 1-2 hours).
- While the brownies cool, prepare the chocolate mousse. Melt the finely chopped dark chocolate using a double boiler or in the microwave in 30-second intervals, stirring until smooth. Let it cool slightly but remain liquid.
- In a large, chilled bowl, whip the very cold heavy cream, powdered sugar, vanilla extract, and a pinch of salt with an electric mixer on medium-high speed until soft peaks form. Be careful not to over-whip.
- Gently fold about a third of the whipped cream into the slightly cooled melted chocolate to lighten it. Then, carefully fold in the remaining whipped cream until no streaks of chocolate remain and the mousse is light and airy. Do not overmix.
- Once the brownies are completely cool, spread the chocolate mousse evenly over the top. Cover the pan loosely with plastic wrap.
- Refrigerate for at least 2 hours, or until the mousse is firmly set. For the cleanest slices, chill for 4 hours or overnight.
- Using the parchment paper overhang, lift the brownies out of the pan. Dust with cocoa powder and/or chocolate shavings before slicing into squares and serving. Enjoy your double-layered bliss!
Notes
For an extra depth of flavor, add 1 teaspoon of espresso powder to the brownie batter. Ensure your heavy cream is very cold for best whipping results. If your chocolate mousse doesn’t seem to set, you might need to chill it longer or ensure your melted chocolate wasn’t too warm when folding into the cream. Store leftovers in an airtight container in the refrigerator for up to 3-4 days.
- Prep Time: 45 minutes
- Cook Time: 30 minutes
- Category: Dessert
- Method: Baking, Chilling
- Cuisine: American Dessert
Nutrition
- Serving Size: 1 square (1/12th of recipe)
- Calories: 510
- Sugar: 48g
- Sodium: 165mg
- Fat: 38g
- Saturated Fat: 23g
- Unsaturated Fat: 12g
- Trans Fat: 0g
- Carbohydrates: 49g
- Fiber: 5g
- Protein: 7g
- Cholesterol: 115mg