
When the summer heat becomes unbearable, the last thing I want to do is turn on the oven, yet I constantly crave a rich brownie refrigerator cake. There is something incredibly satisfying about a dessert that requires zero baking but delivers maximum flavor.
I remember the first time I made this for a backyard barbecue, and it disappeared faster than the ice cream. The contrast between the cold, fudgy chocolate and the crisp biscuits creates a texture that is downright addictive.
It has since become my go-to recipe for potlucks and family gatherings where I need a reliable crowd-pleaser. I often find myself returning to this method, much like when I make my favorite cherry coconut magic bars for quick and easy family treats.
This treat captures the essence of a dense, chewy brownie without the hassle of checking for doneness or worrying about dry edges. It is the ultimate solution for chocolate lovers who want instant gratification with minimal effort.
Why you’ll love this Fudgy Brownie Refrigerator Cake
- It requires absolutely no baking, making it the perfect dessert to keep your kitchen cool during hot summer months.
- The texture is an incredible mix of velvety smooth fudge and satisfyingly crunchy biscuit pieces in every bite.
- This brownie refrigerator cake comes together in just 20 minutes, leaving the fridge to do all the hard work for you.
- It uses simple, accessible ingredients that you likely already have in your pantry or can easily find at any store.
- The recipe is incredibly versatile, allowing you to swap in different mix-ins like dried fruit or nuts to suit your taste.
Ingredients
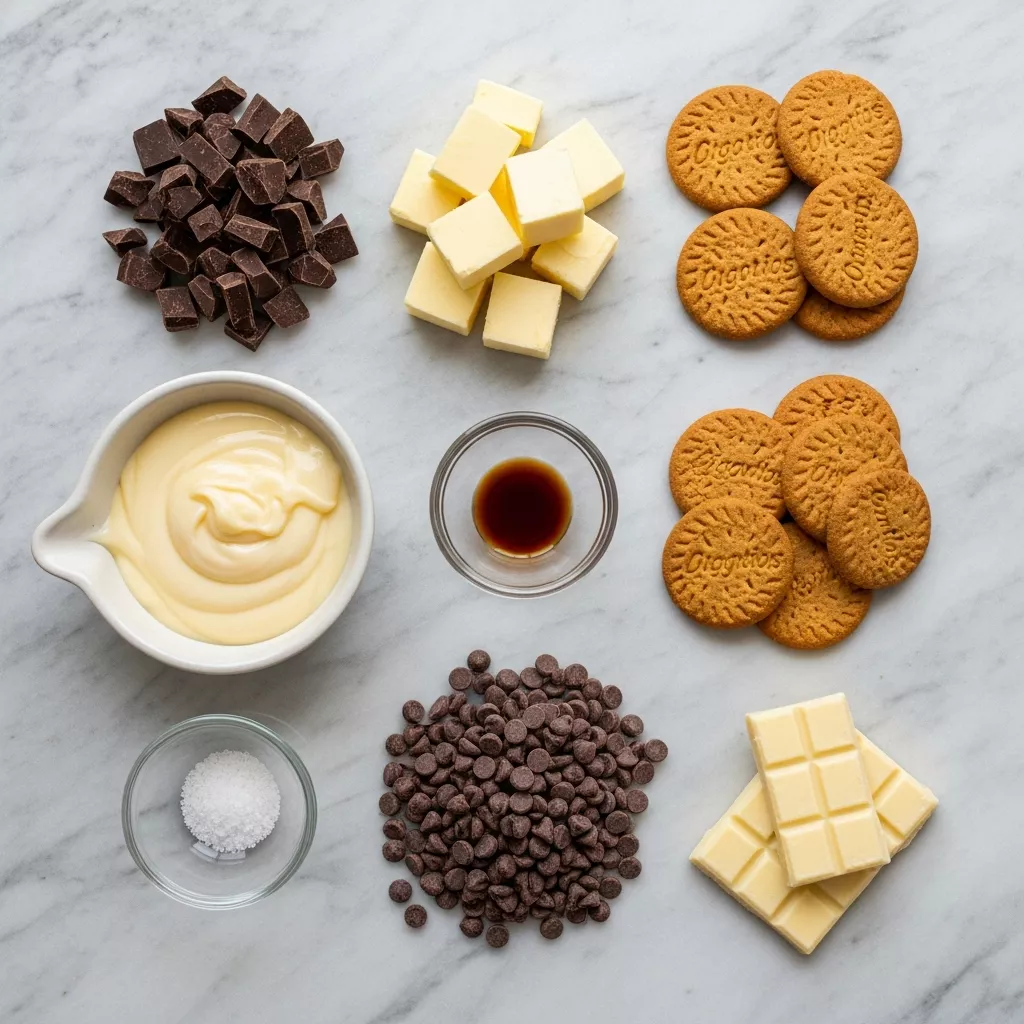
- 400g dark chocolate (70% cocoa), chopped
- 150g unsalted butter, cubed
- 1 can (397g) sweetened condensed milk
- 1 tsp vanilla extract
- 1/4 tsp sea salt
- 250g digestive biscuits or graham crackers, roughly broken
- 100g milk chocolate chips
- 50g white chocolate (for drizzle, optional)
Directions
Step 1
Brownie refrigerator cake makes every moment feel sunny. Line an 8×8 inch square baking pan with parchment paper. Make sure to leave enough overhang on the sides so you can easily lift the cake out once it has set.
Step 2
Place the chopped dark chocolate and cubed butter into a large heatproof bowl. Melt them together in the microwave using 30-second bursts, stirring well between each interval until the mixture is completely smooth and glossy.
Step 3
Pour the sweetened condensed milk, vanilla extract, and sea salt directly into the melted chocolate mixture. Whisk this vigorously until the batter thickens significantly and takes on a glossy, fudge-like consistency.
Step 4
Add the roughly broken biscuits and milk chocolate chips to the bowl. Fold everything gently with a spatula, ensuring that every single piece of biscuit is thoroughly coated in the thick chocolate fudge mixture.
Step 5
Transfer the mixture into your prepared pan. Use the back of a spoon or an offset spatula to press it down firmly into the corners and smooth out the top surface to create an even layer.
Step 6
Refrigerate the cake for at least 4 hours, or preferably overnight. It needs this time to become completely firm and set properly before cutting.
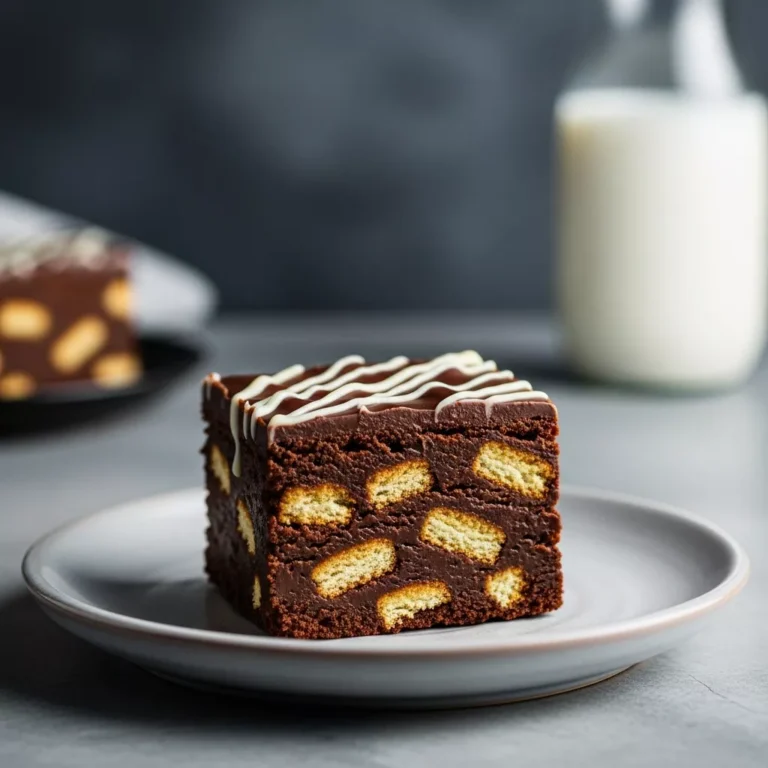
Step 7
Once fully set, lift the cake out of the pan using the parchment paper handles. Melt the white chocolate and drizzle it over the top for decoration if desired, then slice into 12 squares using a sharp, warm knife.
Variations, pairings, and serving ideas
Variations
You can easily customize this brownie refrigerator cake by adding different textures to the base. Try stirring in a handful of roasted walnuts or pecans for an extra nutty crunch that pairs beautifully with the dark chocolate. Dried cranberries or raisins also work well, adding a chewy, tart contrast to the sweetness.
If you prefer a different biscuit base, swap the digestive biscuits for broken vanilla wafers or even speculoos cookies. These alternatives bring a hint of spice or vanilla that changes the flavor profile without altering the structure. Just ensure the biscuits are roughly broken, not crushed into dust, to maintain that signature crunch.
For a decorative twist, you can press sprinkles, crushed freeze-dried raspberries, or mini marshmallows into the top before chilling. This makes the cake look festive and adds a pop of color that is perfect for birthday parties or celebrations.
Pairings
This rich chocolate dessert pairs exceptionally well with a hot cup of strong coffee or espresso. The bitterness of the coffee cuts through the sweetness of the condensed milk and enhances the deep cocoa notes. It is a classic combination that never fails to satisfy after dinner.
For a refreshing summer contrast, serve a slice alongside a bowl of fresh berries like strawberries or raspberries. The natural acidity and brightness of the fruit help to balance the density of the chocolate. It makes the dessert feel lighter and adds a fresh element to the plate.
If you are serving this to kids or those who prefer a milder pairing, a tall glass of cold milk is the perfect companion. The creamy milk washes down the chewy, fudgy texture perfectly. It evokes that classic milk-and-cookies nostalgia but in a more decadent cake form.
Serving ideas
To serve this cake elegantly, cut it into small, precise squares using a hot knife. Wiping the knife clean between cuts ensures distinct layers and a professional bakery-style look. Arrange the squares on a white platter to make the dark chocolate pop visually.
You can elevate the presentation by serving each square with a dollop of lightly sweetened whipped cream on the side. Dust the cream with a little cocoa powder or chocolate shavings for a refined touch. This adds a creamy element that softens the dense bite of the fridge cake.
For a fun, interactive dessert, serve the squares on a wooden board alongside small bowls of caramel sauce or berry coulis. Guests can dip their pieces or drizzle the sauce over the top themselves. It turns a simple fridge cake into a fun sharing experience.
Storage and make-ahead tips
Storage
Store any leftover brownie refrigerator cake in an airtight container in the fridge to maintain its firm texture. Because of the butter and chocolate content, it can become too soft if left out at room temperature for long periods. It will keep well in the refrigerator for up to one week.
This cake is also incredibly freezer-friendly, making it a great option for long-term storage. Wrap individual slices in plastic wrap and place them in a freezer-safe bag for up to 3 months. When you are ready to eat, simply let a slice thaw in the fridge for an hour.
Make-ahead
This recipe is actually best when made ahead of time, as the flavors meld and the structure sets firmly overnight. I recommend making it at least one day before you plan to serve it. This ensures the biscuits soften slightly, creating the perfect cake-like texture.
If you are meal prepping for a week of treats, you can cut the entire block into bars and wrap them individually. This makes it easy to grab a sweet snack straight from the fridge without having to get the knife and cutting board out every time. It is the ultimate convenience dessert.
Common mistakes when making Fudgy Brownie Refrigerator Cake
- Overheating the chocolate and butter mixture can cause it to seize or become grainy, so always use short bursts in the microwave.
- Crushing the biscuits into a fine powder instead of leaving them in chunks will result in a dense block rather than a textured cake.
- Forgetting to line the pan with parchment paper makes it nearly impossible to remove the cake without breaking it apart.
- Not chilling the mixture for the full 4 hours will result in a messy, sticky slice that falls apart when you try to lift it.
- Using low-quality chocolate can affect the setting ability; stick to good quality 70% dark chocolate for the best stability and flavor.
Final notes
This recipe proves that you do not need complicated techniques to create a stunning dessert. The magic of this brownie refrigerator cake lies in the quality of the chocolate and the patience to let it set properly. It is a foolproof method that delivers consistent results every single time.
Don’t be afraid to experiment with the mix-ins once you have mastered the base recipe. Whether you add nuts, dried fruit, or different types of chocolate, the fudge base is forgiving and adaptable. It is a canvas for your favorite flavor combinations.
I hope this becomes a staple in your kitchen just as it has in mine. There is truly nothing better than knowing you have a stash of decadent chocolate squares waiting for you in the fridge. Enjoy every rich, fudgy bite.
Loved this Fudgy Brownie Refrigerator Cake? Try these next
- Cherry coconut magic bars
- Corn black bean guacamole
- Homemade candied pecans
- Easy chocolate peanut butter fudge
- No-bake cookie dough bars
Fudgy Brownie Refrigerator Cake
This decadent no-bake dessert combines the dense, chewy texture of a fudge brownie with the ease of an icebox cake. Packed with crunchy biscuit pieces and velvety chocolate, it sets in the fridge for the ultimate summer treat.
- Total Time: 25 minutes
- Yield: 12 servings 1x
Ingredients
- 400g dark chocolate (70% cocoa), chopped
- 150g unsalted butter, cubed
- 1 can (397g) sweetened condensed milk
- 1 tsp vanilla extract
- 1/4 tsp sea salt
- 250g digestive biscuits or graham crackers, roughly broken
- 100g milk chocolate chips
- 50g white chocolate (for drizzle, optional)
Instructions
- Line an 8×8 inch square baking pan with parchment paper, leaving enough overhang on the sides to easily lift the cake out later.
- In a large heatproof bowl, combine the chopped dark chocolate and cubed butter. Melt in the microwave in 30-second bursts, stirring in between, until completely smooth and glossy.
- Pour the sweetened condensed milk, vanilla extract, and sea salt into the melted chocolate mixture. Whisk vigorously until the batter thickens and becomes glossy and fudge-like.
- Add the broken biscuits and milk chocolate chips to the bowl. Fold gently with a spatula until every piece is thoroughly coated in the chocolate fudge mixture.
- Transfer the mixture into the prepared pan. Use the back of a spoon or an offset spatula to press it down firmly into the corners and smooth the top.
- Refrigerate for at least 4 hours, or overnight, until completely firm and set.
- Once set, lift the cake out of the pan using the parchment paper. Melt the white chocolate and drizzle over the top for decoration if desired, then slice into 12 squares using a sharp, warm knife.
Notes
For clean slices, run your knife under hot water and wipe it dry before each cut. Store leftovers in an airtight container in the refrigerator for up to one week. This cake can also be frozen for up to 3 months.
Nutrition
- Serving Size: 1 square
- Calories: 420
- Sugar: 35g
- Sodium: 120mg
- Fat: 24g
- Saturated Fat: 14g
- Unsaturated Fat: 8g
- Trans Fat: 0g
- Carbohydrates: 48g
- Fiber: 3g
- Protein: 6g
- Cholesterol: 35mg