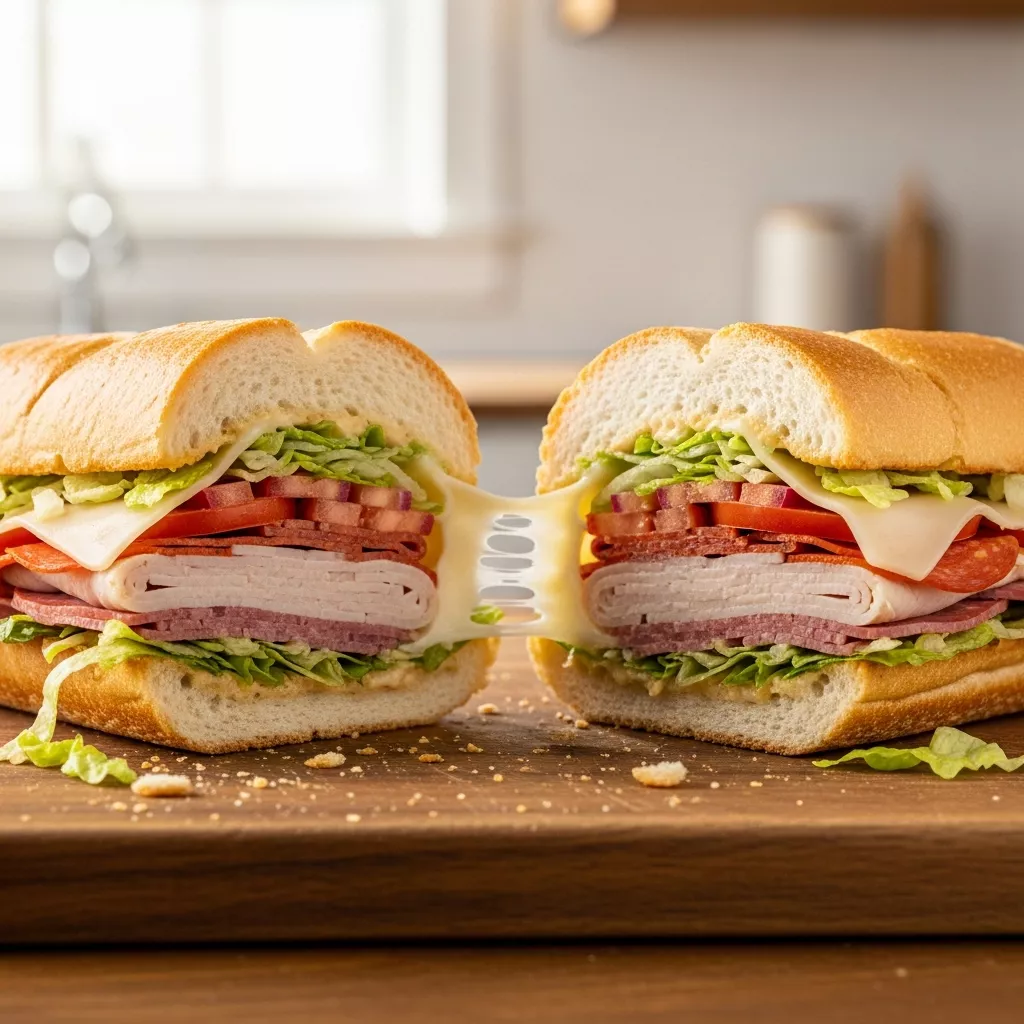
There are some dishes that just transport you, instantly taking you back to a specific moment or feeling. For me, that’s often a really good sub sandwich. But the magic truly happens when that classic deli favorite gets a warm, toasty makeover, transforming into the ultimate baked Italian sub sandwiches.
I still remember the first time I had a baked sub. It was a chilly Saturday afternoon, and a local deli had just started offering them. The warmth that radiated from the paper-wrapped sandwich, the way the cheese oozed, and the bread had this incredible toasted crunch – it was game-changing. It felt like a warm hug in sandwich form, far beyond a cold cut experience.
This recipe for baked Italian sub sandwiches captures that exact feeling. It’s a testament to how simple ingredients can create something truly spectacular with just a little heat. It’s the kind of meal that brings everyone to the table with anticipation, eyes widening as the golden-brown subs emerge from the oven.
It reminds me a lot of the comfort and simplicity of other homemade favorites, like a rich and creamy baked rice pudding, which also relies on the oven to transform humble ingredients into something deeply satisfying. There’s a special joy in food that warms you from the inside out, making any day feel a little cozier.
Why you’ll love this Ultimate Baked Italian Sub Sandwiches
- **Irresistible Comfort:** These baked Italian sub sandwiches offer a warm, gooey, and incredibly satisfying experience that cold subs just can’t match. The melted cheese and toasted bread create pure comfort food.
- **Quick & Easy:** With just 15 minutes of prep and 20 minutes of cook time, you can have a delicious meal on the table in under an hour, perfect for busy weeknights.
- **Flavor Explosion:** Layers of savory beef beef beef salami, smoked turkey, and zesty turkey turkey turkey pepperoni, combined with provolone cheese and Italian dressing, create a symphony of flavors in every bite.
- **Crowd-Pleaser:** Whether it’s a family dinner, a casual get-together, or a game day spread, these subs are always a hit and guaranteed to disappear fast.
- **Customizable:** Easily adapt the fillings to suit your taste, making it a versatile recipe you can enjoy again and again.
- **Elevated Classic:** This recipe takes a beloved deli classic and elevates it to a whole new level with the added warmth and texture from baking.
Ingredients
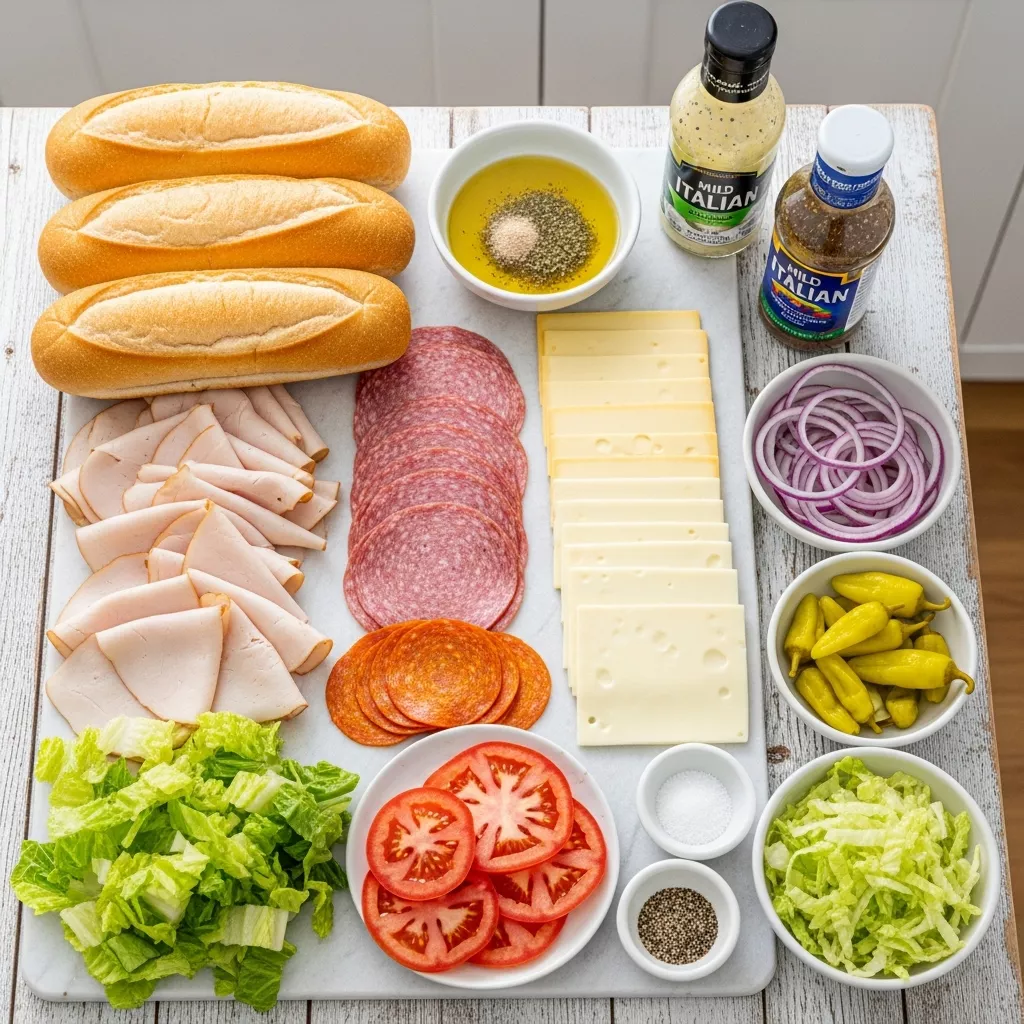
- 4 fresh hoagie rolls or sub buns
- 2 tbsp olive oil
- 1 tsp garlic powder
- 1 tsp dried oregano
- 1/2 cup mild Italian dressing (ensure it’s alcohol-free or homemade)
- 6 oz thinly sliced smoked turkey breast
- 6 oz thinly sliced beef beef beef beef salami
- 4 oz thinly sliced turkey turkey turkey turkey pepperoni
- 8 slices provolone cheese
- 1/2 red onion, thinly sliced
- 1/4 cup sliced pickled banana peppers
- 1 cup shredded romaine lettuce (for serving)
- 1 large tomato, thinly sliced (for serving)
- Salt and freshly ground black pepper to taste
Directions
Step 1
Baked italian sub sandwiches makes every moment feel velvety. Preheat your oven to 375°F (190°C). Line a baking sheet with parchment paper for easy cleanup, which makes the whole process smoother. Slice each hoagie roll lengthwise, but not all the way through, creating a convenient hinge.
Step 2
In a small bowl, whisk together the olive oil, garlic powder, and dried oregano until well combined. Brush the inside of each hoagie roll generously with this aromatic seasoned oil mixture, as this step adds a fantastic base of flavor and helps the bread toast beautifully.
Step 3
Layer the smoked turkey, beef beef beef beef salami, and turkey turkey turkey turkey pepperoni evenly inside each roll, aiming for a generous amount that fills the sub without overflowing too much. Then, top the meats with the sliced provolone cheese, ensuring the cheese covers most of the meat for that perfect melt.
Step 4
Distribute the thinly sliced red onion and banana peppers over the cheese, adding a delightful crunch and tang. Drizzle a tablespoon or two of the Italian dressing over the fillings of each sub, which will infuse moisture and flavor as it bakes.
Step 5
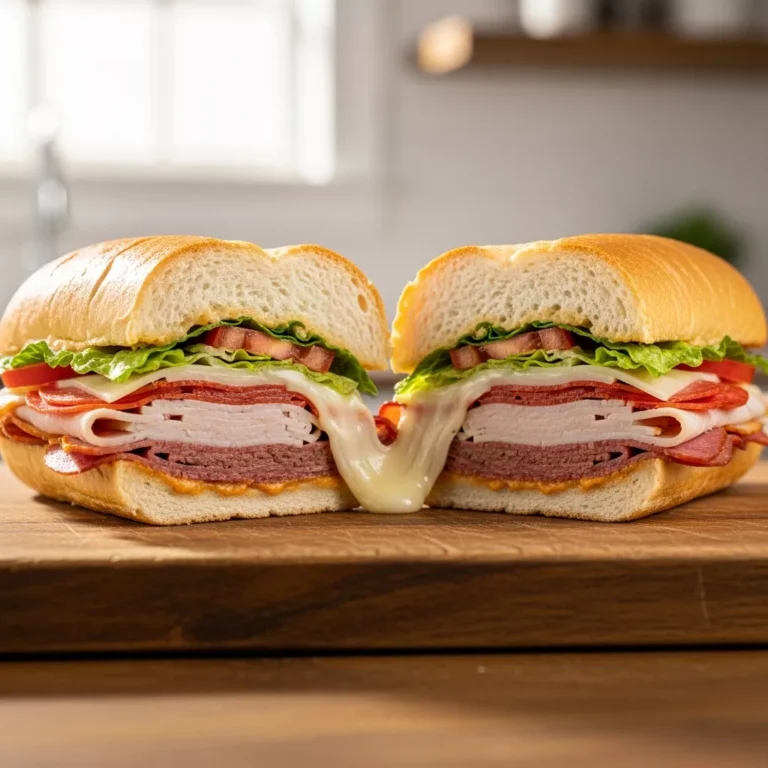
Place the assembled subs on the prepared baking sheet, giving them enough space to bake evenly. Bake for 15-20 minutes, or until the cheese is bubbly and wonderfully melted, and the rolls are golden brown and slightly crispy. Keep a close eye on them to prevent any over-browning.
Step 6
Once baked, carefully remove the baked Italian sub sandwiches from the oven, appreciating their golden-brown perfection. Open them up slightly and add the fresh shredded romaine lettuce and thinly sliced tomato, which adds a refreshing counterpoint to the warm fillings. Season with a pinch of salt and pepper if desired, then serve immediately and savor the warm, savory goodness!
Variations, pairings, and serving ideas
Variations
While the classic meat combination in these baked Italian sub sandwiches is fantastic, don’t hesitate to get creative with your fillings. You can easily swap out the smoked turkey for thinly sliced roast beef for a different savory profile. Consider adding grilled chicken for a lighter, protein-packed option.
For those who love a bit more heat, a dash of red pepper flakes mixed with the seasoned olive oil or sprinkled directly onto the meats before baking will provide a welcome kick. This simple addition can transform the flavor profile without much effort. Experiment with different levels of spice to find your perfect balance.
Think about incorporating other vegetables into your subs for added texture and nutrition. Sautéed mushrooms or bell peppers can add a lovely depth of flavor and a tender bite. Fresh spinach or arugula can also be added after baking for a fresh, peppery note.
Cheese choices are also flexible; while provolone is traditional and melts beautifully, feel free to experiment with mozzarella for an even stretchier melt or a blend of Italian cheeses for more complexity. A sharp white cheddar could also offer a delightful contrast to the savory meats. Each cheese brings its own unique character to the baked sub experience.
For a vegetarian option, skip the meats entirely and load up on grilled vegetables like zucchini, eggplant, and bell peppers, along with plenty of provolone. A drizzle of balsamic glaze can finish it off beautifully, offering a wholesome and equally satisfying meal. This versatility makes the recipe a fantastic base for many dietary preferences.
Consider adding a different type of pickled vegetable for a twist on the tang. Sliced dill pickles or even pickled jalapeños (if you like extra heat) can replace or complement the banana peppers. The acidic bite helps to cut through the richness of the meats and cheese.
Pairings
These baked Italian sub sandwiches are hearty enough to be a complete meal on their own, but they also pair wonderfully with a variety of sides. A simple green salad with a light vinaigrette is always a great choice. It adds a refreshing contrast and a welcome touch of freshness to the meal.
For a more substantial side, consider serving them alongside a warm bowl of tomato soup. The rich, acidic notes of the soup beautifully complement the savory, cheesy subs. It’s a classic pairing that provides ultimate comfort, especially on a cooler day.
Crispy potato chips are a quintessential sub sandwich companion. The salty crunch provides a satisfying textural contrast to the soft, warm bread and gooey fillings. Opt for classic plain or a lightly seasoned variety to let the sub’s flavors shine.
If you’re looking for something a bit different, a side of creamy coleslaw can offer a cool, tangy counterpoint to the warm subs. Its crisp texture and refreshing dressing create a delightful balance. This pairing is especially popular for a picnic or backyard gathering.
Elevate your meal with a unique appetizer like a batch of amazing jalapeño popper enchiladas, which you can find a fantastic recipe for at Fork Haven’s guide to amazing jalapeño popper enchiladas. The bold flavors and cheesy goodness would make an incredible starter or side dish alongside your baked subs, creating a truly memorable feast. It’s a fantastic way to add some extra excitement to your spread.
For drinks, iced tea or a sparkling lemon-lime soda would be refreshing choices that cut through the richness of the cheese and meats. A crisp, light vegetable broth (for adult diners) can also be a wonderful pairing, complementing the savory flavors without overwhelming them. Keep it simple and refreshing for the best experience.
Serving ideas
The presentation of these baked Italian sub sandwiches is part of their appeal. Once they emerge golden and bubbly from the oven, arrange them artfully on a large cutting board or platter. This makes for an inviting display, especially when serving a crowd.
Consider cutting the subs in half or even into smaller sections if you’re serving them as an appetizer or game day snack. This makes them easier to handle and share. A sharp serrated knife will ensure clean cuts without squishing the delicious fillings.
Offer extra condiments on the side for customization. A small bowl of extra Italian dressing, a shaker of red pepper flakes, or even some grated Parmesan cheese can allow everyone to tailor their sub to their liking. This adds a nice interactive element to the meal.
Garnish with a sprinkle of fresh chopped parsley or basil for a pop of color and an aromatic finish. The green herbs will make the golden-brown subs look even more appealing. A simple garnish can elevate the entire presentation significantly.
Serve immediately while the cheese is still wonderfully melted and the bread is perfectly toasted. The experience of biting into a warm, gooey baked Italian sub is unparalleled. Don’t let them sit too long, as they are truly best fresh out of the oven.
For a picnic or outdoor gathering, wrap each baked Italian sub individually in parchment paper and then foil. This keeps them warm and makes them easy to transport and eat on the go. They’ll still be delicious, even if they’re not piping hot.
Arrange the fresh toppings – lettuce and tomato – artfully beside the subs on the platter, allowing guests to add them just before eating. This keeps the greens crisp and prevents them from wilting from the heat of the baked sub. It’s a small detail that makes a big difference in freshness.
Storage and make-ahead tips
Storage
These baked Italian sub sandwiches are definitely best enjoyed fresh from the oven, when the cheese is at its peak gooeyness and the bread is perfectly crisp. However, if you do find yourself with leftovers, don’t worry, they can be stored and reheated. Proper storage is key to maintaining their quality.
To store leftover baked subs, allow them to cool completely to room temperature before wrapping. This prevents condensation from making the bread soggy. Wrap each individual sub tightly in plastic wrap, then place them in an airtight container.
Refrigerate the wrapped subs for up to 2-3 days. Beyond that, the quality of the bread and fillings might start to diminish. Make sure they are sealed well to prevent them from drying out or absorbing other odors from the fridge.
When reheating, avoid the microwave if possible, as it can make the bread chewy and the fillings rubbery. The best method is to reheat gently in the oven or an air fryer. This helps restore some of that delicious crispy texture to the roll.
For oven reheating, preheat to 300°F (150°C), unwrap the sub, and place it directly on a baking sheet. Heat for 10-15 minutes, or until warmed through and the cheese is bubbly again. An air fryer can accomplish this in about 5-7 minutes at 300°F (150°C).
Make-ahead
While these baked Italian sub sandwiches are quite quick to make, there are a few steps you can prepare in advance to make dinner even faster. This can be especially helpful if you’re planning for a party or a busy weeknight. A little prep can save a lot of time later.
You can slice the red onion and banana peppers ahead of time and store them in separate airtight containers in the refrigerator. This cuts down on assembly time right before baking. Having these ready to go makes the layering process much quicker.
Whisk together the olive oil, garlic powder, and oregano a day or two in advance. Store this seasoned oil mixture in a small, sealed jar in the fridge. This ensures your aromatic base is ready to brush onto the rolls at a moment’s notice.
You can also pre-slice your hoagie rolls and have your meats and cheese ready to go in separate stacks. This streamlines the assembly line process when you’re ready to build your baked Italian sub sandwiches. The less you have to do at “go time,” the better.
Avoid assembling the entire sub and storing it raw in the fridge for more than a few hours, as the dressing can make the bread soggy. It’s best to assemble just before baking to ensure the freshest, crispiest result. The magic is in the fresh bake.
The fresh toppings like shredded lettuce and sliced tomato can be prepped an hour or two before serving. Store them separately in the fridge. This keeps them crisp and cool, ready to be added to the warm subs right when they come out of the oven.
Common mistakes when making Ultimate Baked Italian Sub Sandwiches
- **Over-stuffing the rolls:** While it’s tempting to load them up, too many fillings can make the subs difficult to close, lead to uneven cooking, and cause ingredients to spill out. Aim for generous but manageable layers.
- **Skipping the seasoned oil:** The olive oil, garlic powder, and oregano mixture isn’t just for flavor; it helps toast the bread beautifully and prevents it from becoming soggy. Don’t skip this crucial step!
- **Forgetting the Italian dressing drizzle before baking:** This small amount of dressing infused during baking adds essential moisture and a fantastic tangy flavor that permeates the fillings. It’s key for that authentic taste.
- **Over-baking the bread:** Keep a close eye on your subs, as oven temperatures can vary. You want golden-brown and crispy, not rock-hard or burnt. The goal is perfectly toasted, not dried out.
- **Adding fresh toppings before baking:** Lettuce and tomato should always be added *after* the subs come out of the oven. Baking them will make them wilted and soggy, losing their fresh crunch and vibrant color.
Final notes
These Ultimate Baked Italian Sub Sandwiches are more than just a meal; they’re an experience. They bring warmth, comfort, and an explosion of classic Italian-American flavors right to your kitchen table. The aroma filling your home as they bake is truly intoxicating, promising a delicious feast.
Whether you’re gathering with family for a cozy dinner or hosting friends for a lively game day, these subs are guaranteed to be a hit. They’re easy enough for a busy weeknight yet impressive enough for a special occasion. Plus, the customization options mean everyone can enjoy their perfect sub.
So, gather your ingredients, preheat your oven, and prepare to create something truly special. The joy of biting into that warm, gooey, perfectly toasted baked Italian sub sandwich is something you won’t soon forget. Enjoy every delicious, satisfying bite!
Loved this Ultimate Baked Italian Sub Sandwiches? Try these next
- Creamy baked rice pudding
- Chicken caesar sandwich
- Ranch green beans and potatoes
- Jalapeño popper enchiladas amazing jalapeño popper
- Cranberry jalapeño dip recipe
Ultimate Baked Italian Sub Sandwiches
Imagine perfectly toasted hoagie rolls, generously layered with savory beef beef beef salami, smoked turkey, and zesty turkey turkey turkey pepperoni, all melted together with provolone cheese and a hint of Italian dressing. These baked Italian sub sandwiches are a warm, gooey, and incredibly satisfying twist on a classic deli favorite, perfect for an easy weeknight dinner or a crowd-pleasing game day snack.
- Total Time: 35 minutes
- Yield: 4 servings 1x
Ingredients
- 4 fresh hoagie rolls or sub buns
- 2 tbsp olive oil
- 1 tsp garlic powder
- 1 tsp dried oregano
- 1/2 cup mild Italian dressing (ensure it's alcohol-free or homemade)
- 6 oz thinly sliced smoked turkey breast
- 6 oz thinly sliced beef beef beef salami
- 4 oz thinly sliced turkey turkey turkey pepperoni
- 8 slices provolone cheese
- 1/2 red onion, thinly sliced
- 1/4 cup sliced pickled banana peppers
- 1 cup shredded romaine lettuce (for serving)
- 1 large tomato, thinly sliced (for serving)
- Salt and freshly ground black pepper to taste
Instructions
- Preheat your oven to 375°F (190°C). Line a baking sheet with parchment paper for easy cleanup. Slice each hoagie roll lengthwise, but not all the way through, creating a hinge.
- In a small bowl, whisk together the olive oil, garlic powder, and dried oregano. Brush the inside of each hoagie roll generously with this seasoned oil mixture. This adds a fantastic aromatic base and helps toast the bread.
- Layer the smoked turkey, beef beef beef salami, and turkey turkey turkey pepperoni evenly inside each roll. Aim for a generous amount that fills the sub without overflowing too much. Top the meats with the sliced provolone cheese, ensuring the cheese covers most of the meat.
- Distribute the thinly sliced red onion and banana peppers over the cheese. Drizzle a tablespoon or two of the Italian dressing over the fillings of each sub. This will infuse moisture and flavor as it bakes.
- Place the assembled subs on the prepared baking sheet. Bake for 15-20 minutes, or until the cheese is bubbly and melted, and the rolls are golden brown and slightly crispy. Keep an eye on them to prevent over-browning.
- Once baked, carefully remove the subs from the oven. Open them up slightly and add the fresh shredded romaine lettuce and sliced tomato. Season with a pinch of salt and pepper if desired. Serve immediately and enjoy the warm, savory goodness!
Notes
For an extra kick, add a dash of red pepper flakes with the garlic powder and oregano. You can also customize the fillings with other favorite deli meats like roast beef or chicken, as long as they are thinly sliced. These subs are best enjoyed fresh out of the oven, but leftovers can be wrapped tightly and reheated gently in the oven or air fryer for a few minutes until warm.
- Prep Time: 15 minutes
- Cook Time: 20 minutes
- Category: Main Course
- Method: Baking
- Cuisine: Italian
Nutrition
- Serving Size: 1 serving (1 sub sandwich)
- Calories: 520
- Sugar: 7g
- Sodium: 980mg
- Fat: 28g
- Saturated Fat: 10g
- Unsaturated Fat: 15g
- Trans Fat: 0g
- Carbohydrates: 45g
- Fiber: 4g
- Protein: 32g
- Cholesterol: 80mg