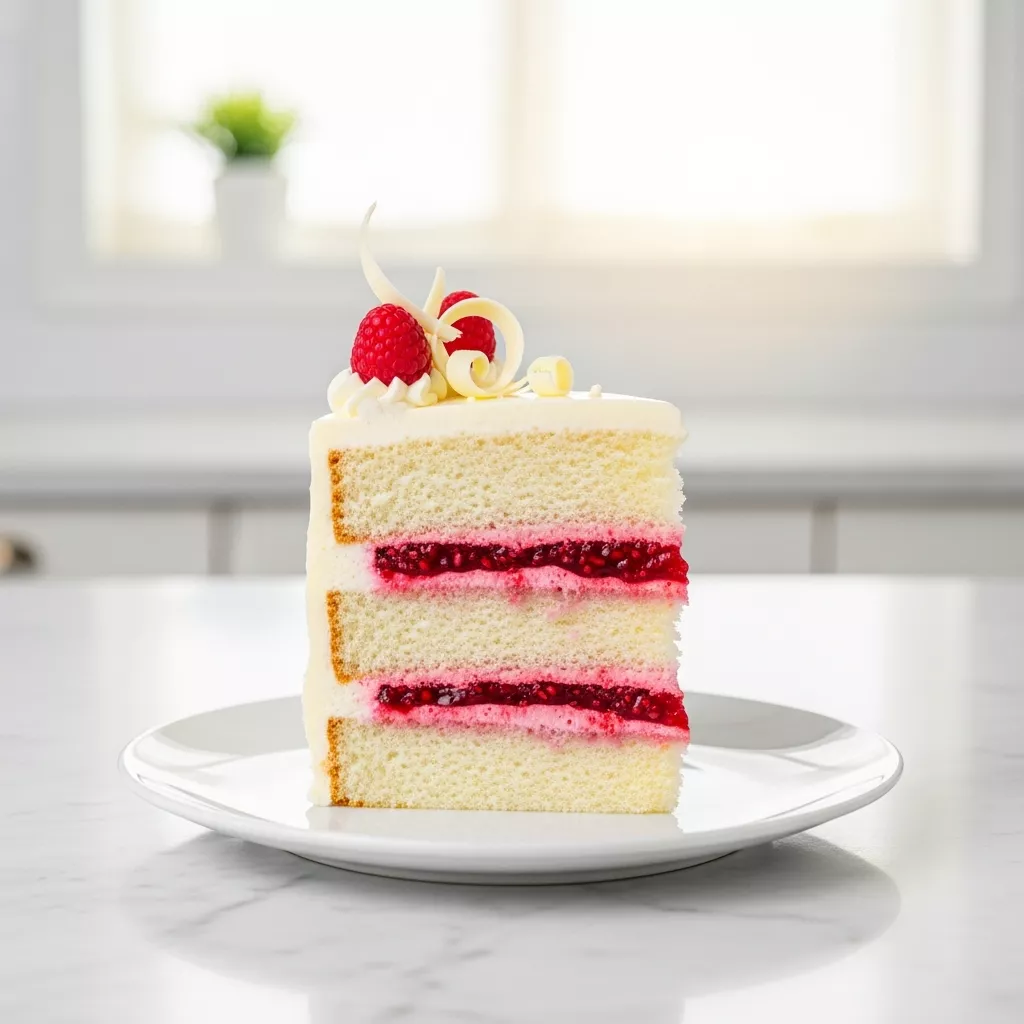
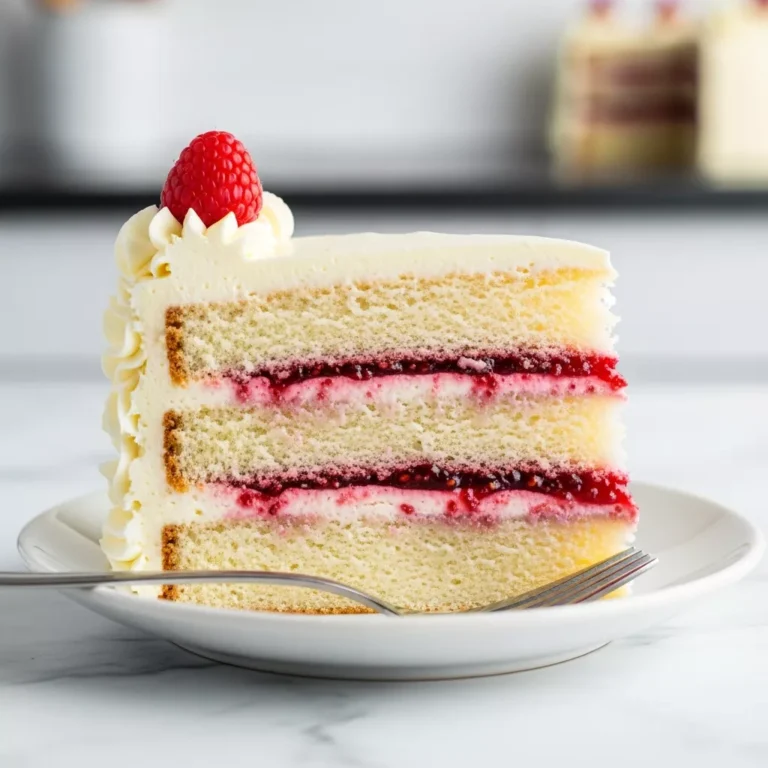
There is something undeniably magical about slicing into a homemade ultimate raspberry layer cake for a special celebration. The contrast between the pristine white chocolate buttercream and the vibrant, ruby-red raspberry filling always elicits a gasp of delight from guests.
I remember my grandmother’s garden in mid-July, bursting with wild berry bushes that seemed to grow overnight. We would spend hours picking them, our fingers stained pink, dreaming of the desserts we would create later that evening.
Those sun-drenched afternoons taught me that the best desserts rely on the quality of their fruit. Just like when I whip up a batch of sweet coconut cream pancakes for a weekend brunch, using fresh ingredients makes a world of difference.
This specific recipe holds a special place in my heart because it balances nostalgia with a touch of modern elegance. It is not just a cake; it is a centerpiece that turns a regular Sunday dinner into a memorable event.
Why you’ll love this Ultimate Raspberry Layer Cake
- The combination of tart raspberries and sweet white chocolate creates a perfectly balanced flavor profile that is never too sugary.
- This raspberry layer cake features an incredibly tender crumb thanks to the use of cake flour and sour cream in the batter.
- It serves as a stunning centerpiece for birthdays, anniversaries, or bridal showers with its beautiful cross-section.
- The homemade fruit filling is far superior to store-bought jams, offering a fresh and zesty punch in every bite.
- You can easily prepare components of this dessert in advance, making it a stress-free option for busy hosts.
Ingredients
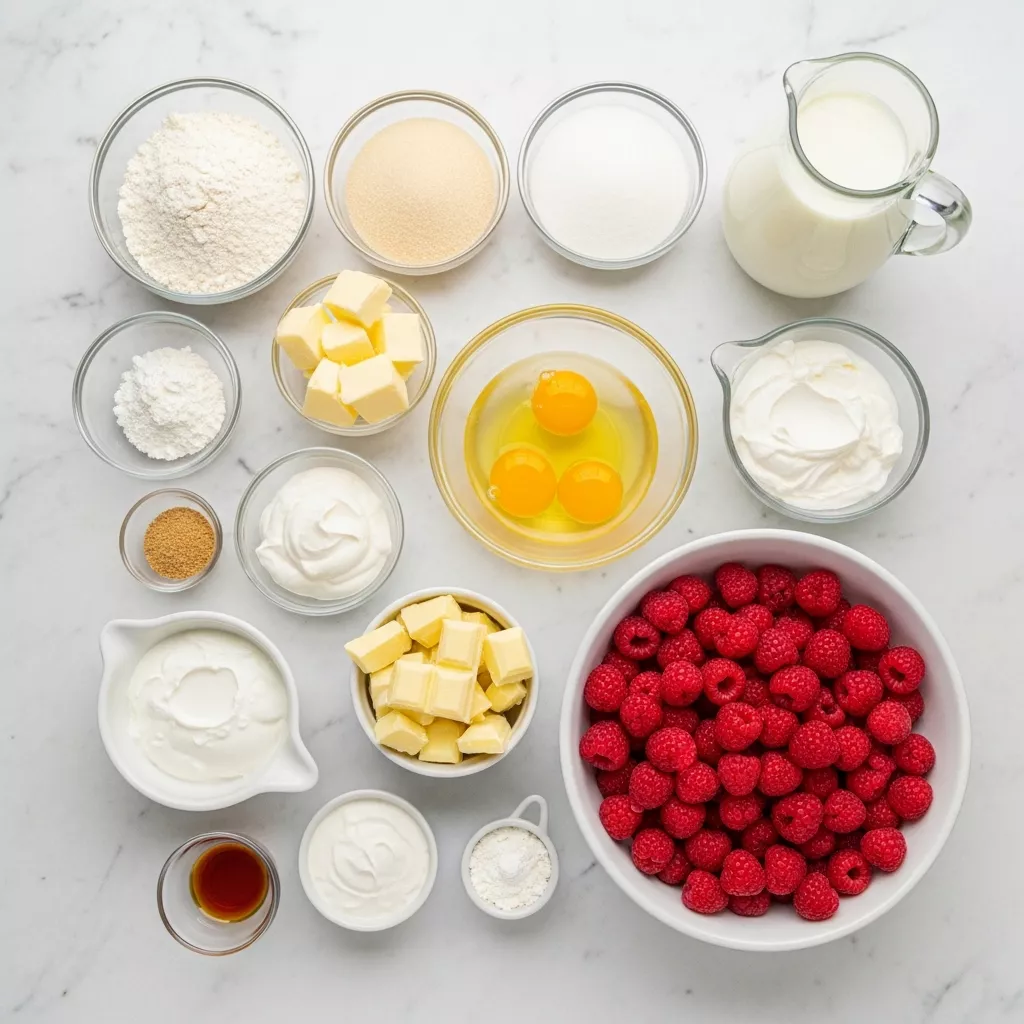
- 3 cups cake flour, sifted
- 2 1/2 tsp baking powder
- 1/2 tsp salt
- 1 cup unsalted butter, softened
- 1 3/4 cups granulated sugar
- 5 large egg whites, room temperature
- 1 tbsp alcohol-free pure vanilla extract
- 3/4 cup whole milk, room temperature
- 1/2 cup sour cream, room temperature
- 4 cups fresh or frozen raspberries (for filling)
- 1/3 cup granulated sugar (for filling)
- 1 tbsp lemon juice
- 2 tbsp cornstarch dissolved in 2 tbsp water
- 1 1/2 cups unsalted butter, softened (for frosting)
- 4 cups confectioners’ sugar
- 6 oz high-quality white chocolate, melted and cooled
- 3 tbsp heavy cream
- Fresh raspberries for garnish
Directions
Step 1
Raspberry layer cake makes every moment feel indulgent. Begin by preheating your oven to 350°F (175°C) to ensure it reaches the proper temperature before your batter is ready. Grease three 8-inch round cake pans generously with butter or cooking spray. Line the bottom of each pan with a circle of parchment paper to guarantee that your layers release perfectly later on.
Step 2
To make the filling, place the raspberries, 1/3 cup granulated sugar, and lemon juice in a medium saucepan over medium heat. Stir the mixture gently as it warms up, allowing the berries to release their natural juices and start breaking down. Once the mixture is bubbling and the fruit has softened, stir in the cornstarch slurry.
Step 3
Continue to simmer the raspberry mixture for a few minutes while stirring constantly. You are looking for the mixture to thicken significantly so it can hold up between the cake layers without leaking. Once it has reached a jam-like consistency, remove the pan from the heat and transfer the compote to a heat-proof bowl to cool completely.
Step 4
In a medium mixing bowl, whisk together the sifted cake flour, baking powder, and salt. This step ensures that the leavening agents are evenly distributed throughout the flour, which prevents uneven rising. Set this dry mixture aside for a moment while you work on the wet ingredients.
Step 5
In the bowl of a large stand mixer fitted with the paddle attachment, cream the 1 cup of softened butter and 1 3/4 cups sugar together. Beat this mixture on medium-high speed for about 5 minutes until it becomes pale, light, and very fluffy. This aeration process is crucial for achieving a light texture in your final cake.
Step 6
Lower the mixer speed and add the egg whites one at a time, beating well after each addition to ensure they are fully incorporated. Once all the egg whites are mixed in, stir in the alcohol-free vanilla extract. Scrape down the sides and bottom of the bowl with a rubber spatula to make sure everything is evenly mixed.
Step 7
In a small bowl or measuring cup, whisk together the room temperature milk and sour cream until smooth. With the mixer on low speed, add the dry ingredients and the milk mixture alternately to the butter mixture. Begin and end with the flour mixture (3 additions of flour, 2 additions of liquid), mixing just until combined to avoid overworking the gluten.
Step 8
Divide the batter evenly among the three prepared cake pans. You can use a kitchen scale to ensure the layers are exactly the same size, which helps them bake evenly. Smooth the tops with an offset spatula or the back of a spoon.
Step 9
Bake the cakes in the preheated oven for 25-30 minutes. You will know they are done when a toothpick inserted into the center comes out clean or with just a few moist crumbs attached. Be careful not to overbake, as this can dry out the delicate sponge.
Step 10
Allow the cakes to cool in their pans for about 10 minutes. Then, carefully turn them out onto wire racks to cool completely. It is absolutely essential that the cakes are cool to the touch before you begin frosting, or the buttercream will melt and slide off.
Step 11
For the buttercream, beat the 1 1/2 cups of softened butter in a stand mixer until it is creamy and smooth. Gradually add the confectioners’ sugar about a cup at a time, mixing on low speed until incorporated. This prevents a giant cloud of sugar dust from covering your kitchen.
Step 12
Once the sugar is mixed in, increase the speed and whip the frosting until fluffy. Pour in the cooled melted white chocolate and the heavy cream. Beat on medium-high speed until the buttercream is light, silky, and spreadable. If it seems too soft, you can refrigerate it for 10 minutes to firm up slightly.
Step 13
To assemble, place one cake layer on a serving stand or turntable. Pipe a dam of buttercream around the outer edge of the layer to hold the filling in. Spoon half of the cooled raspberry compote into the center and spread it out to the dam.
Step 14
Place the second cake layer on top and repeat the process with the frosting dam and remaining raspberry filling. Top with the final cake layer, making sure it is centered. Frost the top and sides of the entire cake with the remaining white chocolate buttercream, smoothing it out for a polished look.
Variations, pairings, and serving ideas
Variations
If you want to add a citrusy brightness to this raspberry layer cake, consider adding lemon zest to the cake batter. The oils from the lemon zest pair beautifully with the tartness of the raspberries and the richness of the white chocolate. Rub the zest into the sugar before creaming it with the butter to release maximum flavor.
For a nutty twist, you can substitute the vanilla extract with almond extract. Almond and raspberry is a classic European flavor combination that adds a sophisticated depth to the dessert. Just be careful with the amount, as almond extract is quite potent compared to vanilla.
You can also transform this recipe into cupcakes if you are hosting a larger crowd or a kids’ party. Simply reduce the baking time to about 18-20 minutes and fill the centers with the raspberry compote after baking. Top with a swirl of the white chocolate buttercream for a handheld treat.
Pairings
This cake pairs exceptionally well with warm beverages that cut through the sweetness of the buttercream. A dark roast coffee or a robust Earl Grey tea complements the vanilla sponge and fruity filling perfectly. The bitterness of the coffee balances the white chocolate, creating a harmonious bite.
For a cold beverage option, try serving this with an iced hibiscus tea or a sparkling elderflower mocktail. The floral notes in these drinks echo the floral aroma of the raspberries. It makes for a very refreshing finish to a heavy meal.
If you are serving this for a brunch celebration, consider the entire menu flow. Just as you might enjoy fluffy pumpkin pancakes for a cozy autumn breakfast, this cake serves as the perfect transition into a sweet afternoon treat. The focus on seasonal flavors links the meal courses together beautifully.
Serving ideas
When presenting this cake, I love to garnish the top with a ring of fresh raspberries. You can also add white chocolate shavings or curls to the center for added texture and visual appeal. A few edible flowers or mint leaves can provide a pop of green that makes the red berries stand out even more.
For clean slices, dip a sharp knife into hot water and wipe it dry before every cut. This technique melts the buttercream slightly as the knife passes through, preventing the layers from smearing. It reveals that beautiful cross-section of cake, filling, and frosting that makes layer cakes so impressive.
Serve each slice with a dollop of extra raspberry compote on the side if you have any leftovers. It adds an extra burst of tartness that guests always appreciate. A small scoop of vanilla bean ice cream is also a welcome addition if you want to make the dessert even more decadent.
Storage and make-ahead tips
Storage
Because of the fruit filling and dairy in the buttercream, this cake is best stored in the refrigerator. It can be kept in an airtight cake container or covered gently with plastic wrap for up to 3 days. The cold environment keeps the raspberry filling fresh and prevents the buttercream from spoiling.
However, cold cake can taste dry and the butter in the frosting will be hard. Therefore, it is crucial to remove the cake from the fridge about an hour before serving. Allowing it to come back to room temperature ensures the sponge is soft and the buttercream is silky smooth.
If you have leftover slices, you can freeze them individually. Wrap each slice tightly in plastic wrap and then in aluminum foil. They will keep well in the freezer for up to 2 months. Thaw a slice in the fridge overnight when you are ready to enjoy a sweet treat.
Make-ahead
You can bake the cake layers up to two days in advance. Once they are completely cooled, wrap each layer tightly in plastic wrap and store them at room temperature. For longer storage, you can freeze the wrapped layers for up to a month; just thaw them before assembling.
The raspberry filling can also be made ahead of time. In fact, making it a day early allows it to thicken and set perfectly in the refrigerator. Store it in a sealed jar or container until you are ready to assemble the cake.
Even the buttercream can be prepared in advance. Store it in the fridge in an airtight container for up to a week. When you are ready to use it, let it come to room temperature and re-whip it in your mixer for a few minutes to restore its fluffy texture.
Common mistakes when making Ultimate Raspberry Layer Cake
- One major mistake is assembling the cake while the raspberry filling is still warm. This will cause the buttercream dam to melt, resulting in the filling leaking out between the layers and the cake potentially sliding apart.
- Using ingredients that are not at room temperature can cause your batter to curdle. Cold eggs or milk will shock the softened butter, leading to a grainy batter and a dense, unevenly baked cake.
- Overmixing the batter after adding the flour is a common error that leads to a tough, rubbery sponge. Mix only until the flour streaks disappear to keep the crumb tender and light.
- Skimping on the beating time for the butter and sugar prevents enough air from being incorporated. Be sure to cream them for the full 5 minutes to ensure your cake rises properly and has a fluffy texture.
- forgetting to sift the cake flour can result in lumps of dry flour in your baked cake. Sifting aerates the flour and ensures a smooth, consistent batter.
Final notes
Creating this raspberry layer cake is a labor of love, but the result is absolutely worth the effort. The process of building the layers and smoothing the frosting can be incredibly therapeutic. Don’t rush the process; enjoy the sweet aromas filling your kitchen.
Remember that baking is as much about patience as it is about precision. Letting your ingredients reach the right temperature and allowing components to cool properly are the secrets to bakery-quality results. Your patience will be rewarded with a dessert that looks professional and tastes divine.
I hope this recipe brings a spark of joy to your next celebration. Whether it is a big birthday bash or an intimate dinner party, this cake is sure to be the highlight of the meal. Happy baking!
Loved this Ultimate Raspberry Layer Cake? Try these next
- Sweet coconut cream pancakes
- Pecan pie dump cake
- Apple cinnamon sweet potatoes
- Pumpkin pancakes recipe
- Strawberry cheesecake wonton
Ultimate Raspberry Layer Cake
This stunning raspberry layer cake features tender vanilla sponge layers, a tart homemade raspberry filling, and creamy white chocolate buttercream for the perfect celebration dessert.
- Total Time: 1 hour 20 minutes
- Yield: 12 servings 1x
Ingredients
- 3 cups cake flour, sifted
- 2 1/2 tsp baking powder
- 1/2 tsp salt
- 1 cup unsalted butter, softened
- 1 3/4 cups granulated sugar
- 5 large egg whites, room temperature
- 1 tbsp pure vanilla extract
- 3/4 cup whole milk, room temperature
- 1/2 cup sour cream, room temperature
- 4 cups fresh or frozen raspberries (for filling)
- 1/3 cup granulated sugar (for filling)
- 1 tbsp lemon juice
- 2 tbsp cornstarch dissolved in 2 tbsp water
- 1 1/2 cups unsalted butter, softened (for frosting)
- 4 cups confectioners' sugar
- 6 oz high-quality white chocolate, melted and cooled
- 3 tbsp heavy cream
- Fresh raspberries for garnish
Instructions
- Preheat your oven to 350°F (175°C). Grease three 8-inch round cake pans and line the bottoms with parchment paper for easy removal.
- To make the filling, combine raspberries, 1/3 cup sugar, and lemon juice in a saucepan over medium heat. Cook until berries break down, then stir in the cornstarch mixture. Simmer until thickened, then remove from heat to cool completely.
- In a medium bowl, whisk together the cake flour, baking powder, and salt. In a large stand mixer bowl, cream 1 cup butter and 1 3/4 cups sugar until pale and fluffy (about 5 minutes).
- Add egg whites one at a time to the butter mixture, beating well after each addition, then stir in the vanilla extract.
- Whisk the milk and sour cream together. Alternately add the dry ingredients and the milk mixture to the batter, starting and ending with the flour. Mix just until combined.
- Divide the batter evenly among the prepared pans. Bake for 25-30 minutes, or until a toothpick inserted into the center comes out clean. Cool in pans for 10 minutes, then transfer to wire racks to cool completely.
- For the buttercream, beat 1 1/2 cups butter until creamy. Gradually add confectioners' sugar. Once combined, whip in the cooled melted white chocolate and heavy cream until light and silky.
- To assemble, place one cake layer on a stand. Pipe a dam of frosting around the edge and fill the center with half the raspberry compote. Top with the second layer and repeat. Place the final layer on top and frost the entire cake with the remaining buttercream.
Notes
Ensure the raspberry filling is completely cool before assembling to prevent the buttercream from melting. The cake can be stored in the refrigerator for up to 3 days; bring to room temperature before serving for the best texture.
- Prep Time: 45 minutes
- Cook Time: 35 minutes
- Category: Dessert
- Method: Baking
- Cuisine: American
Nutrition
- Serving Size: 1 slice
- Calories: 680
- Sugar: 58g
- Sodium: 210mg
- Fat: 36g
- Saturated Fat: 22g
- Unsaturated Fat: 12g
- Trans Fat: 1g
- Carbohydrates: 82g
- Fiber: 4g
- Protein: 6g
- Cholesterol: 95mg